Thursday, May 30, 2019

Trumpeter in May

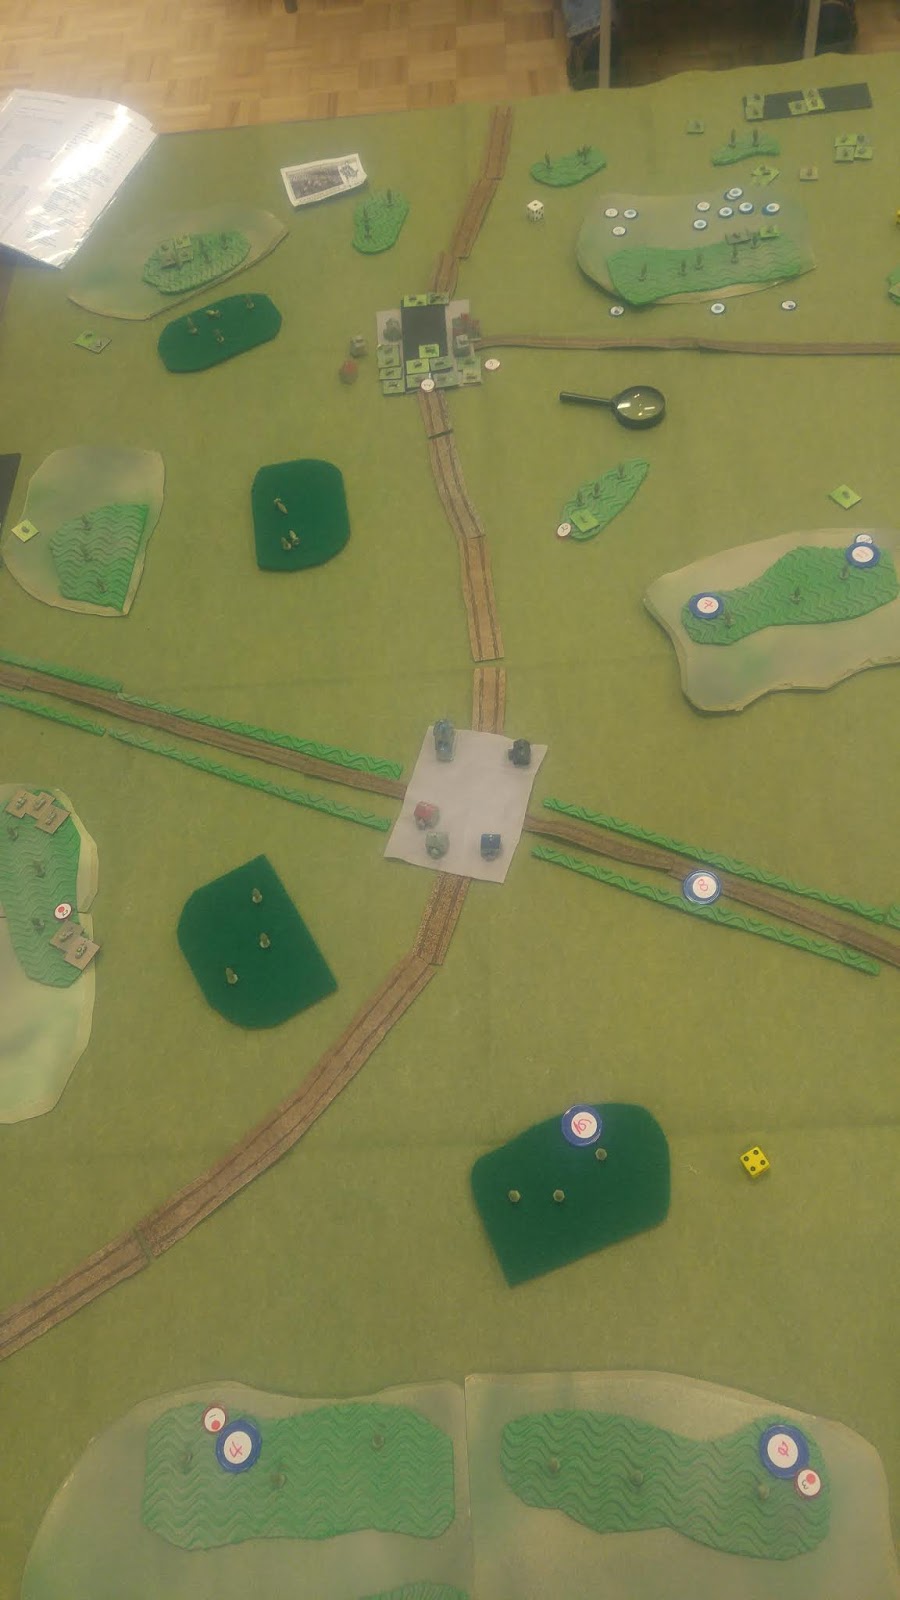
For the May meeting, I decided to get involved with some micro micro armour. 3mm to be precise and they are very good Oddzial Osmy (Picoarmour) models in that I can figure out what type a tank each one is supposed to represent.

I played the German commander of a Kampfgruppe composed of teachers and students from a tank training school pitted against a brigade of British tanks. Basically, it was their 45 tanks vs my 13. On the positive side, 4 of mine were Tiger 1s and 2s along with 5 Panthers. However, half the British tanks were Fireflies with those nasty 17lbers.

I decided on a defense on depth with the Panthers blocking the left, which represented the most covered approach. I put my junkiest units up front on the right, and the heavy hitting Tigers at the back to keep the range as long as I could for as long as I could. I put one minefield on the extreme left to prevent slipping around the back of the Panthers while the other minefield would prevent the British from setting up a good fire line on some key hills.

Things started out moderately well with the Panthers taking out some Shermans way out on the far right making up for the blindness of the student tank hunters on the right. That caused the one company to fall back.

As a knock-on effect, the Sherman company on my left thought better of going up the centre out in the open and went around the hill to my far left. While they were doing that, my Panthers, Tigers, and others proceeded to pound the centre Sherman company.

However, it was not entirely one-sided. As I was reducing the centre and right Shermans, they did manage to wipe out my two units of tank hunters, which left me with nothing on the right. But while the remnants of the centre and right companies worked their way down the right (joined by the 4th company, which was created from earlier casualties), I turned my attention back to the leftmost Sherman company. A quick duel turned into a rout at the cost of a single Panther and the Sherman company retreated back around the hill, only to eventually reappear in the center after a couple of turns.

Eventually the weight of numbers began to tell as the Tigers brewed up under the attention of the Sherman companies on the right. Then the Panthers began to die until the German side had only one Tiger 2 and one Panther facing more than a dozen Shermans, at which we called the game. The Germans had killed more than 2 Shermans for each of their own casualties but it just wasn't enough against all of those Fireflies.

Chris has written a pretty interesting set of rules that have a lot of potential. They flow well and are pretty simple. I think the one refinement that needs to happen is to ditch the precision of the gun penetrations and adopt the simpler system he has for the armour.


Wednesday, May 1, 2019

Trumpeter Salute 2019

 (Apologies for the bad photos but the lens on my phone is badly scratched and smudged)

On April 13th, I went to Trumpeter Salute 2019, which is the biggest miniature war gaming convention in the Vancouver area. They had a good selection of games last year so I was really looking forward to this year's event.

A new feature they had this year was an online game registration where you could pre-register for one game. Very good idea and I hope they continue it next year.

Game 1

This was my pre-registration game. The rules were General D'Armee and the battle was Maxheim, which featured the French battling a combined Prussian-Russian force. One of the quirks of the allied side was that the Prussians had brigades on both flanks with the Russians in the centre.

In an omen on how things were to go, the French won the initiative and immediately occupied the village to my front. I decided I was not going to assault the village and instead opted for a delaying action, especially as we needed command dice to re-position a Prussian cavalry brigade to counter a French cavalry brigade. 

Being on the left flank, I'm a little fuzzy on the details on what happened on the right, but a disaster happened early over on the right where the Prussian cavalry and infantry routed. My contribution was to roll 0 aide d'camps out of 6 dice to try and rescue them. I think the Umpire just moved them back to the edge of the board rather than off. 

Meanwhile, on my side, I had lured the French beyond the garrison range and got ready to counterattack. First attempt met with a 12 rolled for casualties and my charge pretty much stopped before it could begin. Second attempt actually led to us rolling for the charge effect, but me rolling a 2 compared to a 10 or something saw another fail. 

I love the rules but this was a brutal game to play. All of the key die rolls by the Prussians and Russians were miserable failures.

Game 2

Mongolmania pitted Mongols against Rus in an all cavalry battle using Lion Rampant rules.  The Mongols started as a massive horde at one end of the table with three different groups of Rus trying to prevent them from exiting off the other side. Colin modified the rules slightly so that a failure to activate a unit didn't end your turn. Also, he had some special effects for rolling a 2 or a 12 when activating a unit.

I took a group of Rus. There wasn't much strategy in this and it was close. The turning point came quite late in the game. I had a unit of light horse that got the benefit of +1 to hit with archery and +1 to bravery because of a couple of 12s I had rolled. This unit was like a tactical nuke in that it took out 5 Mongolian units and it was untouched, while most of the remaining Mongolian units were pretty worn down (as were the Rus as well). However, a Mongolian player rolled a 12 and got a free shot on my super unit. Worse, he rolled really well and took out 3 figures. I then rolled a 2 for morale and that was it.

With not much Rus left, Colin declared the Mongols the victor in a close and bloody fight. Good fun!

Game 3

 In this game, the French were out to burn down a British fort using the Musket and Tomahawk rules. I was commanding the British provincial regulars in the fort and the provincial militia and Indians in the woods. Marching to my relief were two units of Scots regulars and two units of rangers. The French surprised me a bit by starting out on the far right instead of closer.

I decided to get aggressive with my Indians and advanced them into the woods that I expected the French to have been in. After a little hesitation, I advanced my militia down the centre. This turned out to be a minor mistake that lead to bad consequences. Meanwhile, the French slowly moved on the far right, staying largely out of sight in the woods.

My Indians reached the far edge of the woods and got into a musketry duel with 3 units of French irregulars. Despite being outnumbered, over the rest of the game, the British Indians decimated the French irregulars with remarkably accurate musketry. The British Indians suffered 2 total casualties while the French lost 30 of 36. However, the French did achieve their objective of keeping the British Indians away from the rest of the French forces (and even distracted British militia a bit).

Meanwhile, back at the fort, my regulars saw little until the French Indians and more irregulars arrived within 6" of the fort. (Seriously, who the heck builds a fort that close to dense woods?)

A remarkably poor morale roll saw my regular retreat from the walls early in the turn. That really was the game because the French Indians used remarkably effective flaming arrows to set the walls alight and also ran up to the wall and use torches.

Even getting a unit of regulars into the fort had little effect. The fire arrows were too effective and there were too many Indians and the fort started to burn.

Credit to the French for coming up with a good plan and being persistent in executing it, even if they left the French irregulars to get massacred by the British Indians.

(Photos to come)