Thursday, November 19, 2020

Nostalgia: Photos of the Stouffville House

 Having posted about the house we are leaving in Abbotsford, I found the real estate shots of our Stouffville house that me left in 2017. We did hire a staging company for this one but keen observers will note that the stager used a lot of our stuff. To be fair, we used what the stager did as ideas to furnish and decorate in our Abbotsford house such as the paint colour and the glass top tables.

We'll start with the view from the front entrance looking towards the living room at the back of the house.

We originally had a bench seat in the hallway but we replaced that with the less practical but more photogenic glass console table.

And here is the reverse view looking back.


Here is the living room from the kitchen area.


And here is the reverse showing the kitchen from the living room.

Swinging a bit to the left, we have the dining area, which includes sliding doors to go outside to the back yard. The back yard wasn't too much to look at, basically a 40x20 foot area with a small patio and a loud air conditioner.

The landing of the stairs, which you would see the moment you stepped in the doors and looked to your left and then the stairs themselves.

The office, with a view out the front and a faked daybed. It's really just a bunch of boxes with a bed cover on them. We always intended to have a daybed in there though.


The main bedroom with a view out the back.


The ensuite bathroom, which was double in size over the Abbotsford bathroom, but nowhere near as nice. I much prefer a proper dedicated shower over the tub/shower combo.

Finally, the guest bedroom.

Maybe I'll be able to dig up the Brampton house. If so, I'll post those pix as well.


Sunday, November 15, 2020

Gaming Stuff Packed

 Here is my miniature life reduced to a few boxes.

One big black box contains most of my Chain of Command 28mm miniatures and terrain. The only bits that it doesn't contain, trees and buildings, are in the grey box with the blue top. The other big black box contains miscellaneous gaming stuff including my lead mountain.

The white shelving unit is my bit box. It used to also contain my paints, which have been replaced by 15mm ECW figures and the forests and buildings of my 2mm board.

The yellow box and Mary Kay bag contain my 6mm figures and terrain, both finished and based and unfinished. The Mary Kay bag is seriously the best thing a miniature gamer could use for traveling to gaming events. It has 4 boxes on trays for miniatures to go in with slide out access. Rules will fit in front of the boxes. The top part (originally meant for lipsticks) can lift out and is where I put all of my trees in. I can put some tall buildings in there as well. The side pouches are nice areas to put gaming equipment in such as dice, measuring tapes, containers of tokens, and so on. The bag has both a nice carry handle and a good strap for carrying on your shoulder. 

And here is my travel boxes with reading material. Because I might not be able to get to the other miniature boxes for 6 months or so as they go into storage, I have some miniature supplies to tide me over. I packed my 15mm tanks in there, a whole bunch of toothpicks, stir sticks, and other bits of wood so that I can do some terrain crafting, especially when we self-isolate after moving. I also put my 15mm Americans in there just in case I feel like painting. Speaking of paints, that's what the tackle box contains.

I'm quite proud of how compact my collection is at the moment.

Friday, November 13, 2020

Photos of the Abbotsford House

 We're into the home stretch of packing to leave, but I thought I would post the real estate pictures of the house. Please ignore the distortions that the photographer uses to make it look bigger and brighter. I do want to point out that we really didn't stage the house too much so it does/did look like this once we finished our renovations. 

Let's start with a video

And here is what it looked like through photos:


It is a raised ranch style house with the entrance half way between the levels. This is the view of the upper level after you climb the stairs and look to your left.
I miss our fish but we had to rehome them. Here is the view from the living room looking into the dining area.
Here is the opposite view from the previous one. The stairs are immediately behind the sofa.
Here is the view from in front of the fireplace. You can see the kitchen.
Here is the dining area with the French doors to the deck.
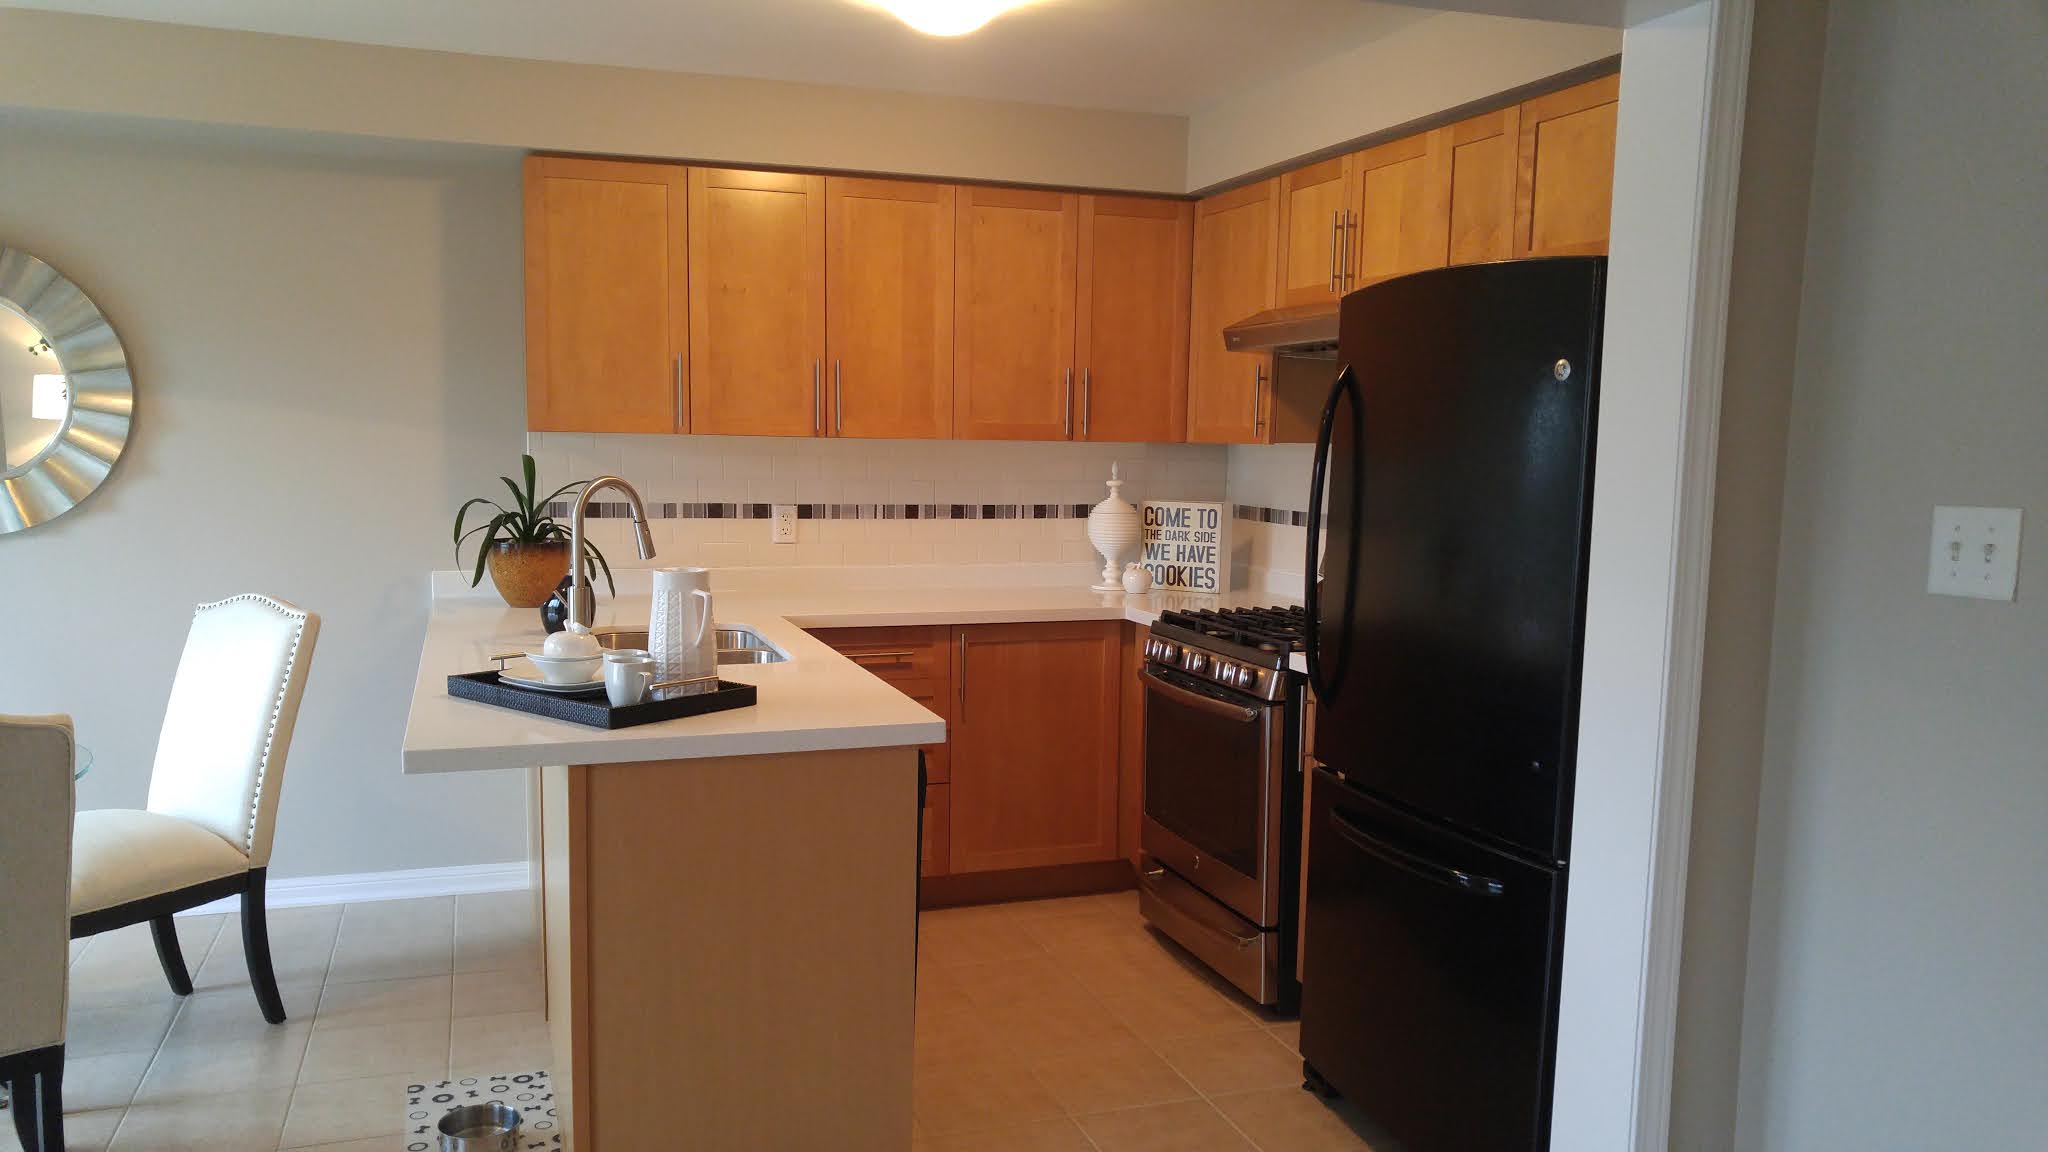
This is the view of the kitchen you get if you go from the top of the stairs and continue forward.
And here is the view looking from deep in the kitchen over the island and into the living room.
Here is the opposite view of the kitchen. This is pretty much as we bought the house with the only real change being replacing the ugly tiles with the vinyl planks.  
The main bedroom.
The ensuite bathroom, which has to be the smallest but nicest bathroom we have ever had. It's not much bigger that what you would find on a cruise ship, but it does have a fantastic shower with bench, much more storage that you would think, and heated flooring.
This is the shower, which we rebuilt completely. Originally, it had a fiberglass shell that led to a 30 inch by 30 inch shower. Getting rid of the shell and moving one wall over by 8 inches (so that it actually conforms to the blueprints!) doubled its size.
The guest bedroom.
The home office.
The main bathroom, where you would hardly notice the 8" it gave up to the ensuite bathroom.
The main room downstairs, which became my hobby room and COVID office.
Behind my hobby area and office was an extra area that we used as a spill-over bedroom.
The view of the deck after stepping out onto it from the dining area.
This is the view of the deck. To the very right are the French doors in the dining area that you use to get onto the deck. The raised area where the red umbrella is is where the pool used to be. We removed the pool because it was a nasty cheap one that had not been properly winterized.
The main seating area, which we used extensively over our three summers in the house. 
The house from the back across the back yard. The deck is massive but there's still plenty of yard. This picture is taken between the pear tree on the right and the plum "tree" on the left.

This is easily the best house we have ever owned and we're a bit sad to leave it much quicker than we had planned.


Sunday, September 20, 2020

On the Move Again

 I got laid off at the end of July. I gave myself six weeks to find a new job at the same salary or else we'd sell the house and move back to Ontario. There were a few reasons for this timeline:

  • Housing sales start to dip in October and selling in November and December is much tougher.
  • Prices on houses had remained strong because of low mortgage rates combined with limited inventory.
  • COVID-19 seemed to be spiking again and we definitely wanted to be on the market before 14 days after the long weekend. We definitely didn't want to be trying to sell during a lockdown.
We got a very good offer last weekend, and with me narrowly missing out on a job that could have kept me in Abbotsford, we had to take the offer.

I'll miss all the great people I've met here in British Columbia, my co-workers, my neighbours, and the gamers who attend Trumpeter and those who don't.

Meanwhile, this is a shot of my workbench, research library, and my gaming storage cupboard. I had cleaned up considerably to the showings, so this area is usually not so tidy. 


The one cool thing I found is that my 2mm terrain project is basically the exact same size as the top of my gaming cupboard. This was not planned but sometimes things just work out.

Thursday, September 3, 2020

Socially Distanced Gaming

 So, at the beginning of the month, word went out that the naval gaming group would be holding a socially distanced naval game.

I was intrigued.

So how does one safely wargame while maintaining a safe 2 metres apart? The answer is to hold a game outdoors and to extend the ranges significantly.


(I'm the shadow in the middle on the right. This was the perspective from the Dunkerque at the start of the game. )

We met at a concreted reservoir. I was given the USS South Dakota (I think). The scenario started with a group of 4 Japanese battleships. Their goal was to break out and they would win if any of their ships did. The surrounding battleships were broken into two sides and spaced out individually surrounding the Japanese ships in a gigantic circle about 50 feet in diameter. Each ship was given a specific enemy to sink to win. Mine was the HMS Hood.

I faced an immediate problem. The two ships that were closest to me were on the other side. Additionally, one of those ships, an Italian BB, had my ship as its target. Worse, I would have to get past the Dunkerque to get to the Hood. The cherry on the trouble sundae was that the Japanese ships immediately headed in my direction.

My only real option was to sail away from the Italian ship and from the Japanese ships, so I turned tail and ran. My plan worked as well as could be expected. Because I ran away, the Japanese ships instead concentrated on the Dunkerque and Hood. The Japanese players struggled to get the range right but they did some pretty significant damage to the Dunkerque, knocking her out for three turns.

But the Japanese ships were taking a pounding from all of the other ships and this played a role in keeping the Dunkerque afloat. I had turned around to get ready to take out the Dunkerque but she came back to life.

At this point we called the game. It was an interesting experience to play and I would do it again.

Tuesday, July 14, 2020

Problem with Panzers

So I've run into a problem with my plan to create transformable tanks. My suspicion that the German Pz III and Pz IV conversions were going to be tougher than the Allied tanks has proven to be correct.

The problem is that the guns come in pieces: a piece with the barrel (one for each type of gun) and a piece without (only one). I was hoping to drill out a hole in each piece and insert my magnets, but there just isn't quite enough depth. I tried replacing one of the magnets with a piece of steel, but it won't work.


I haven't given up on my plan though.

I'm going to attempt to cast the piece without the barrel. I'm going to create a mold and then use 5 minute epoxy to make enough parts so that each gun will have both parts. 

Wish me luck. My next posting with detail how I did it and how it turned out.

Monday, June 15, 2020

Crusader I, II, and III

Having finished the two Grant/Lee tanks, I decided that I would tackle the four Crusader tanks because they seemed easier than the German tanks. How foolish of me. 

The chassis went together nicely. My plan of adding the Crusader I MG turret worked out nicely. I just thinned out the plastic a bit to help the turret stick. It probably did not need it because I've found the magnets powerful enough to attract through at least one layer of plastic.


It was after I cut out the turret parts that I realized that magnetizing the options was going to be a bit more difficult than I had thought. There's two turret tops but only one turret bottom. So, to swap between the Crusader III and the earlier models, I would have to magnetize the top and bottom. And of course, the two turret tops have completely different hatches, with earlier versions having a slide top. And the Crusader I/II has two different types of gun, a 2lber and a 3" howitzer. 


18 magnets later, I have a completely swappable tank able to be Crusader I complete with auxiliary turret, a Crusader II, a Crusader II CS, and a Crusader III. 


At least I have a pattern to use for the remaining three tanks. I'm going to pay greater attention to polarity in this one so that all the parts will be swappable across all of the Crusaders. This is an extra pain but it will be a benefit when it comes time for gaming. I reckon that fiddling with polarity has added about 30% extra time, but I'm getting a bit smarter in dealing with it.

Thursday, June 11, 2020

Next Project: Tanks a lot!

 
I have plenty of tanks. But most of them are 6mm. I do have a very small number of 28mm tanks (2xT34 from two different manufacturers and of different sizes, a Hetzer, and a Sdkfz 222). The 6mm are fine for What A Tanker played on a small board via web cam, but they really don't cut it for a proper game. 

But I do have some 15mm tanks. I have 4 metal T34s of unknown origin, an ancient Battlefront T34 with a resin body and turret and metal accessories, and two sets of FOW El Alamein kits that I won while attending Trumpeter events. One came as a full game, the other was just the tanks.

After the extended time it took to do the 2mm terrain, I figure that doing 15 tanks was a more manageable goal within a reasonable time, especially when the all metal tanks are already done.

But I'm not going to limit myself to just assembling the plastic ones. Why build just a Grant when you can change the turret and have a Lee? Why bother with Buttoned tokens when you can button or unbutton the model?

So armed with some glue, about 260 3mm x 1mm magnets, some knives, a dremel, a drill, tweezers, some other tools, and a whole bunch of patience and ambition, I'm planning on making convertible tanks.

I started off with a Grant. Initially, I was just planning on making it buttoned/unbuttoned, but then I realized that the kit allows me to build as a Lee as well. (The instructions don't show how to build a Lee but the parts are there.) Had I realized before I started that you also had a choice of M2 and M3 for the 75mm sponson gun, I might have attempted to make that swap-able as well. On second thoughts, that might be more trouble than it's worth though.  

Anyway, here is the first tank:

This Grant is buttoned up but I can swap in the open hatch with commander. Or I can go with the Lee turret with the button or unbuttoned MG turret. Because I only have 6 British figures for 6 British tanks, I needed to make the command figures swapable too, and so I can move the commander to the open Lee hatch. The magnet that holds the open MG turret to the main turret serves a double duty as it also holds the command figure through a very thin plastic layer (you can actually see a bit of the magnet.

Tuesday, June 9, 2020

Project 2mm Terrain: Lessons Learned

So now that I am done with my 2mm terrain, what are my thoughts?
  • At times it was a slog, other times it was enjoyable. The toughest moments were half way through the contours, probably somewhere around the 120 foot mark. I had been creating elevations but was mostly just almost covering the previous contour. I enjoyed putting on the flock the most because of how good it made the board look.
  • I'm stubborn. Even though I knew my contouring was flawed, I kept consistent with my method even though it was not efficient nor fast.
  • In retrospect, I should have done a contour every 20 feet because that would have represented the actual slope of the land better.
  • I might not do contours next time. Instead, I'll do smoothed hills. That being said, I think the contours worked pretty well for this board.
  • Stupidly, I didn't bother using Google Earth to look at the terrain until I nearly completed the contours. I guess I got excited by having a good contour map to look at and just didn't consider the vertical scaling.
  • There's a number of maps of Gaines Mill and other than all of them agreeing that Boatswain's Creek being wooded, they didn't agree much with the placement of other woods and swamps. In the end, I use the contour map for the Boatswain's Creek woods and another map for the other woods. I also extended the Boatswain's Creek woods and swamp based on the description of the battle. I figured the D.H. Hill probably had a good reason not to just immediately attack the far left of the Union line, so I gave him that reason with that terrain. 
  • Looking at the actual contours, the positioning of some of the Union units makes little sense, particularly the artillery, so I moved them a bit for my recreation shots. Accounts of D.H. Hill coming under long range artillery fire is only possible if the batteries on the Union left are on the ridge line and not in the valley where the map has them.
  • The 3mm x 1mm magnets I bought (300 for $15CDN) work just great for placing the buildings.
  • It will be quite a while before I do any more 2mm terrain. I do have some buildings, walls, and tree castings I can paint.
  • If I do another board like this, it will probably be for Antietam (or part of it because that is a pretty big battle).

On to the next project. Let me give you a hint:


Thursday, June 4, 2020

Project 2mm Terrain: Done!!!!!

It's done! Finally finished!
I had a momentary bit of panic when I could not find my 2mm figures. While it's distressing to search and search for something, there was some good that came out of it: I did a little reorganization of my hobby desk/storage, cleaned out one more bin of hobby stuff, found some more 2mm terrain bits, and  found another 15mm tank that I can use for What A Tanker!. 

So in celebration of finishing the project, I put my newly found figures onto the terrain board. The stands represent roughly the positions in the battle of Gaines Mill 1862 at 2:30pm. I didn't put troops in the woods, but I could have because the woods are removable (as are the buildings). As my figures are based according to Antietam and for a different corps, the regiment names don't correspond to the regiments in the battle.

Anyway, here for you enjoyment are some pix:

Gregg's Confederate brigade emerging from the woods to attack Warren's Union brigade

View from above showing Gregg disguised as Wilcox and Warren disguised as Brooke

A third view of the action

From the Confederate viewpoint

DH Hill's division arrives on the far left of the Confederates
View of DH Hill's arrival in Old Cold Harbor. He would continue in this direction until he arrived on the flank of Gregg

Buchanan observes Hill's arrival with a protective swamp to his front

In the centre, Branch is launching his attack to support Gregg to his left. On the right, is Field. On the other side of the creek, Lovell's Unionists await in the woods.

Porter commands from near the Adams farm. Gregg's attack is in the background to the right. Directly ahead is the rear rank of Lovell's brigade.

To Porter's left, Martindale makes his headquarters in Watt's house. Most of his troops are dug in half way up the bank of Boatswain's Creek. To the left of Martindale is Butterfield.

A shot showing Field's Confederate brigade in the centre advancing in the woods of Boatswain's Creek. To his left is the second rank of Branch's brigade and behind him, partially obscured by woods is Pender. Powhite Creek is in the foreground and to the right.

Pender's brigade following Field's.