Showing posts with label Terrain. Show all posts

Monday, January 12, 2026

Gone to Ground

 In The Men Who Would Be Kings, tribal infantry can, as an action, choose to go to ground as their action. So I needed a set of markers for this.


This gives warriors like Zulus some defense against bullets and artillery.


I bought a cheap makeup case to put my markers in. To make them fit, I printed a rack to hold these markers. They are a little squished to make all 8 fit.


Monday, September 1, 2025

Pinned!

 I used my 3D printer to create some pinned markers. The first 4 were not successful because of various mistakes, but I fiddled with the model until it worked.

I then painted the metal of the tack silver, painted the body red, and painted the tops of the letters white. I put some watered PVA on the surface and dipped each one in fine turf.

A final step that I will do later is to spray a PVA water mix to seal everything down.

I'm pretty pleased with how they turned out.

Saturday, March 6, 2021

Fencing, Again (Part 2)

 Continuing my project from last time, I completed all of the brush between the fence. I then spray primed it grey followed by a brown wash everywhere. This is what the fences looked like at this stage:


I loosely painted a warm grey and then semi-dry brushed white over top. Not really dry but more of a sloppy waving of the brush over the very top surfaces. I followed this up with a black ink wash. As a final step, I painted the base brown and used the same colour to give the brush a little tint so that they would stand out a bit from the rails.


I'm really happy with how I managed to age the wood and get the appearance of grain. The extra time spent carving up the sticks paid off so that they just don't too manufactured.


Because enclosures should have gates so that farmers can enter their fields, I made a couple:


That's 6 feet of fences. I really should have doubled this project but I can make more.


Monday, February 15, 2021

Fencing, Again (Part 1)

 With some free time, I'm getting back into miniatures. I've decided to make some fences. Specifically, I'm basing them on the fences that you see here:


(If you own the picture, please let me know and I will replace the picture with a link to your site. I tried to go to the site watermarked in the photo but there's no easy way to find this image.)

So my plan is to create a set of vertical posts with double sets of dowels between them. Then I will use wire to simulate the thin sticks between them.

I started with 12 popsicle sticks and drilled three holes in each. Should you be interested, I'm enjoying a Thornbury Dam dark lager.

Then I glued the horizontal beams on both sides. 

Finally, I laid down a bead of PVA and cut some bristles from an old paint brush (thanks Gerry!). I inserted the bristles between the beams to recreate the thin branches that were used to fill in between the posts.

I've just done the one half to see how it turns out.


Tuesday, May 26, 2020

Project 2mm Terrain: Update 12

The end is nigh! I've done the swamp, completed the woods, and finished the buildings. The penultimate step I've just completed: giving everything a good spay with a Mod Podge and water mix to stick everything down and seal it.

The final step is to paint the frame just to make it look good. I've got some nice grey house paint that should do the trick. It won't take much time to do.

So here's an other teaser shot of the terrain to whet your appetite. My next posting will have a bunch of glamour shots showing the final board, complete with detachable forests and buildings and with my 2mm miniatures in roughly the Gaines Mill deployment.

Monday, April 27, 2020

Project 2mm Terrain: Update 11

With the end in sight, I'm making a determined effort in the three remaining areas:
  • Woods
  • Swamp/bog
  • Buildings
I was going to do some planted fields but I think I'm going to leave them out so that the terrain is a little more reusable. With magnetized buildings that I can remove, the board can also be used for 6mm as well as 2mm.

For the woods, I was hoping to use something like paper, which would be flexible so that the contours would show up. Instead, I am using just plain foam core that I've piled up with clump foliage.


(I'll add clump foliage to the sides, but it is not sticking quite as well as I had hoped. It's going to take a couple of passes, I think.)

I encountered a problem with warping with my first test piece but I think I can bend it into submission. The problem of having too even of a colour for the trees I think I will fix by some creative other flocking and also by a little staining and painting after I've sealed them with a coating or two of diluted Mod Podge. Scattering some clump foliage randomly around the board will also help tie the whole board all together.

I have also broken up the woods into clumps so that I can remove just the bits I need. 
I will use magnets so that the forest clumps stick a bit to the board so that I can remove them as needed.

I'm hoping to complete the woods by the end of the weekend, but I'm probably optimistic about that.

Sunday, April 5, 2020

Project 2mm Terrain: Update 10

Last week, I hurt my back while trying to suppress a sneeze because I was holding my dog at the time (ridiculous as this sounds) and I didn't want to drop her. It got worse Thursday and Friday, but with drugs and ample use of a TENS machine, on Saturday I felt pretty decent so I thought I could flock my board as a relaxing afternoon diversion.


I'm pretty happy with the initial flocking. There's plenty of helpful Youtube content out there on how to flock and armed with that knowledge, I put down this first coating for the general fields. The dark patches are going to be heavy woods and I'm thinking a mix of coffee grounds and a dark green flock will be good to represent this terrain, plus eventually a canopy of coarse turf as the tree tops. The medium brown represents bogs and marsh and I'm thinking about using some static grass and coarse dark green turf for that.

I think I do need to consult with Lukes APS, Mel the Terrain Tutor, and maybe some others because I'm not sure whether I seal this layer and then do another or just keep layering on and then seal.

I may have overdone things on Saturday because my back is a bit sore this Sunday. I did take some pix and post them because I'm happy with the progress.

Monday, March 30, 2020

Project 2mm Terrain: Update 9

Now that renovations have finished, I got a little time this weekend to do some miniatures stuff. I got the urge to work on my terrain board. I was hoping to start flocking it but instead I'll settle for blocking out the heavy woods, swamp, and other terrain, because white background is the devil when it comes to flocking.


One of the reasons I had problems is that I discovered that I only have 2 inch brushes or 00 brushes. Nothing in between. So it meant slathering on with the big brush and then having to use the small brush to put in the edges.


Nevertheless, this is progress!

I must say the board looks radically different with the contour lines now blending in.

Monday, February 24, 2020

Project 2mm Terrain: Update 8

The project has taken a back seat to house renovations, and as a result, I've lost a lot of momentum and my will to complete it has fallen off quite a bit. Perhaps documenting where I'm at will help me get my mojo back on this.

Basically, I have completed the terrain elevations. I have also put some boards around the outside, which cleans up the edges and provides support and rigidity.


I have partially sealed the entire thing but I think I will wait until I get to some Mod Podge to do the job properly. I have to see how much dirt brown paint I have because I want to paint the entire thing with three different browns: regular dirt, a darker shade for swamp and bog, and a different brown for forested areas.

Once I have that done, I can put the roads in and flock it. Then it will be about putting in buildings and fences and other features.

Thursday, October 17, 2019

Project 2mm Terrrain: Update 7

Woooo Hooo!

✅ 80 ✅ 90 ✅ 100  ✅ 110  120  130  140  150  160  170  180  190

I've completed all the hills on the board! It took a lot longer than I expected but I did get faster as I went along.


Here's the board almost complete with just the corner to go. I finished it the next night. Despite each contour being only 1mm, there's some really substantial valleys in the board.

Things I learned

Well, I've learned a few things that, if I ever do this again, I would do differently:
  • Not do every contour line. I would just do every second contour using the foamcore and use polyfilla to smooth out the contour lines
  • Put reinforcing bars. About half way through, the board started to warp and it's now at about 1/2 inch on both ends. 
  • Cork is a neat material to use. I would use it more often for contouring because it is easy to cut using scissors, flexible, and resists compression. It is pretty expensive if you need to use a lot.

What's next

  1. Add some 1x1 bars to the back to straighten it out.
  2. Since I have decided to keep the contours showing, trim some of the paper overhangs so that all of the contours are clean.
  3. Seal the board so that it won't absorb water when I flock.
  4. Mark the locations of the waterways, roads, and buildings.
  5. Figure out how tall to make the trees.
  6. Figure out where to put the woods and how to do them. One woods is marked on the board. I've seen another map with woods in other locations.

Saturday, September 7, 2019

Project 2mm Terrain: Update 6

✅ 80 ✅ 90 ✅ 100  ✅ 110  120  130  140  150  160  170  180  190

That's another 2 levels done. The next set of two are the trickiest in terms of complex shapes but after that, the hills smooth out and take up less overall terrain.


The more I think about it, the more I'm inclined to keep the contour lines. I won't be saving any time because I would need to clean up the paper overhangs, but I think it will perform better as a gaming table, even if it is not quite as "realistic". There's a kind of honesty to keeping the construction method exposed that I'm appreciating.

(I really need to get a new phone. These are terrible pictures)

Sunday, September 1, 2019

Project 2mm Terrain: Update 5

✅ 80 ✅ 90 ✅ 100  ✅ 110  120  130  140  150  160  170  180  190 

Woo Hoo! I have the wind at my back and things are progressing nicely. I've just completed up to the 120 foot contour. It's this contour and the next two that are the most complex, large, and fiddly. The pinning technique is working brilliantly and it's helping to speed things up.

I'm currently waiting for the glue on the second part of the 120 to dry so that I can trim off the excess. So I thought I would take some time while the glue dries to do this update. Sorry, no pix but they really wouldn't show anything.

I've been watching Luke's APS channel on Youtube and it is brilliant in how he shares his techniques. Yes, he pushes his products but that is redeemed by how he reveals how he actually makes his products and how he uses them and how he uses competing products. From his one-day builds, he's given me an idea on how to finish and protect this project. If I can find it cheap enough, I'm planning on using a deep picture frame, turn it upside down, and insert the terrain. If I can't, I'll have a go at making the equivalent.

Wednesday, August 28, 2019

Project 2mm Terrain: Update 4

Well, I have now completed the hills on the extreme left of the battlefield, where the initial Confederate thrust came from.

I'll confess that my slow progress has mainly come from a lack of motivation, slow progress, and how fiddly the whole process has been. But last night, I had a brain wave. Since I am using foamcore and cork as my materials, I can just pin the terrain in place until it is dry. All of a sudden, the fiddliness has gone away and it's just become a matter of cutting the pieces out, gluing them, and pinning them in place.

Completing the western hills represents only a small fraction of the entire battlefield but doing something and having it come out looking really good has raise my morale and now I want get the rest done.

I was toying with the idea of smoothing out the contours but now I've gone the other way and I'm thinking I might keep them. I might do some experimentation before I decide.

Wednesday, July 17, 2019

Project 2mm Terrain: Update 3

✅ 80 ✅ 90 ✅ 100  110  120  130  140  150  160  170  180  190 

I have now done the 90 foot contour and the 100 foot contour. The one change to my plans is that I've ended up gluing the paper pattern I used to cut the contours back onto the elevations. I think it will help me with positioning the roads, buildings and creeks later on.


I'm liking how it is looking but it is much, much slower going than I had anticipated. And it will get a lot worse too because the two levels that I did are likely the easiest ones to do. The next 2 levels will be the worst.

There are two "islands" on the left side and I've got one in the above shot. I'm going to the much larger one next and build it up to its apex of 170 feet because it will be useful practice for the rest of the board. I've already learned that I need to cut inside the lines and I shall learn a few more things as I go.

Sunday, July 7, 2019

Project 2mm Terrain: Update 2

So, I've spent the last few days tracing out the topographic lines with a different colour for each elevation.


Though tedious, it has been a useful exercise because sometimes the lines get hard to see, obscured by something on the map, or even almost overlapping. Tracing has let me work out what lines apply to each elevation.

It's also let me figure out the general lay of the land. Most of the battle field is at 150-170 feet.

I've also had yet another rethink and I've decided that I'm going to go with a 1mm cork with 2mm foamcore. I just couldn't find any 1mm board that would be sturdy enough so this will be a compromise of the heavy durability of cork and the cheapness of foamcore. It's going to be every second elevation line with the foamcore and the cork providing the step up between.

The next step is cut out the 100 foot mark, use it as a pattern on the foam core. Then I'll do the same for the 90 mark on the cork.

(I also apologize for the really crappy photography. The lens on my phone is so scratched up that all photos no look like they've been taken in a heavy fog.)

Wednesday, July 3, 2019

Project 2mm Terrain: Update 1

I now have the big map done and cut to fit my board. I ended up extending the length of the board by 3" just in case I want to recreate the battle exactly. The extra 3" lets me put 3 Confederate batteries on board, which is always better than off board.

I also skewed the map slightly to minimize the 80' contour and confine it to the very corner of the board.

I think the next step is to colourize the contour lines because my plan is to cut each contour out one at a time and use it as a pattern to cut my foamcore. This would be an effectively irreversible process (because I would need to reprint the map, tape it together, and re-cut the contour lines), so I don't want to make a mistake. I'm hoping the colouring will reduce the chance of an error.

I expect I won't be ready to cut my first contour until the weekend.

Tuesday, July 2, 2019

Project 2mm Terrain: A Slight Rethink

Of course, the moment I clicked Publish on my grand plans, all kind of thoughts came rushing forward. Most of them I dismissed right a way, but there was one that seemed kind of important.

The key thing about this project is that even though I may never game on the board, it is possible that I might. This means that it needs to work as a gaming board. Near the position of Anderson's battery, there's a rather steep hill down to the Powhite creek. It occurred to me that on the terrain board that the 5 levels of change might be a little steep for even 2mm figures on bases to handle. Basically, I was looking at the rise and run being about the same. I really don't want the miniatures to be tumbling down hills unless the hill is basically impassible.

(As an aside, I did a bit of a rough calculation and as far as I can tell, it's a 50 foot altitude change in 250 feet, so at a 20% grade, it is a significant descent.)

So I decided to blow the map up a bit more to mellow out the ascents and descents. So instead of going up 5 levels in about a 1/2", it will be closer to 1". As an added bonus, I think I can get rid of the 80' altitude band (the red line) to simplify my work (or I might just carve it into the MDF through a bit of Dremel work).


The cost is now I must position the big map onto the MDF to figure out which parts of the battlefield will disappear. I suspect the main subtractions will be on the right and on the bottom.

So it's a tiny step backwards but I think it will be better.

Monday, July 1, 2019

The Next Project: Project 2mm Terrain

With renovations slowing down for the summer, it's time to get back to building or painting some miniatures. So, in line with my New Year's Resolutions, it's time to announce my latest project:

Terrain for 2mm ACW

I don't really see anybody wanting to game with my 2mm figures but I do want to have some terrain so that they can have a nice display at the very least. I might even get some solo gaming in if I have something to play on. So, this has lead to this project.

Where to start

I've always liked those architectural models they used to do to display new buildings. They'd have a nice topographical levels to show the slopes and changes of elevation. I want to do that.

I've done a poke around the interwebs and stumbled upon a really good site for these maps: https://www.battlefields.org.

I wanted an eastern battle and I wanted one with some water features and some woods but also not too much. I also wanted one that looked reasonably big but not too big and with some elevation changes but not too much. 

In the end, I selected Gaines Mill, June 27th 1862. There's five creeks but only two are really important. There's some significant woods but they consume more than 15% of the board. There's between 70-190 feet of elevation but I'm going to ignore the very lowest level. Each contour line is 10 feet (I'm assuming feet because it is a US organization). As a bonus, I can easily extend the battlefield to the north and do Cold Harbor.

Here's the map:

The yellow is the 150 feet elevation, the green is 100, and red is 80 feet.

(Actually, there's three of them and they are slightly different in what they show, which will be handy in filling in the bits covered by the legend, title, and compass rose.)
 https://www.battlefields.org/sites/default/files/atoms/files/gaines-mill-june-27-1862-1-1.pdf.

If my calculations are correct, I'll be running a 1/6000 ground scale.

The plan

Here's the plan
  1. ✅Select the map.
  2. ✅Get the base board. I'm using a 2x4 piece of 2mm MDF but I'll only use 2x almost 3 of it for the board itself.
  3. ✅Get the material to build the elevations. I was originally going to use MDF for the elevations but there's a few problems with that. MDF is nasty stuff to work on dust wise and I want to minimize my lung's exposure to it. Secondly, while I actually have the perfect power tool to cut the back and forth wanderings, it's a power tool and I have limited time available to use it. Instead, I've gone with a nice set of foamcore boards. As a bonus, they're also a bit cheaper. With foamcore, I can just use some scalpels.
  4. ✅Scale up the maps to fit.
  5. Starting with the lowest elevation, start cutting out the hills. I have two copies of the map printed and ready to go (and I can make more copies if need be. I have 12 elevations to do but very few of them will be simple cuts.
    • ✅ 80 (only in the very lower left of the battle field)
    • ✅ 90
    • ✅ 100 (lower left and extending up the left side and from the left to the left centre)
    • ✅ 110
    • ✅ 120
    • 130
    • 140
    • 150 (the bulk of the battlefield is in this elevation or within 20 of it)
    • 160
    • 170
    • 180
    • 190 (just a few hilltops in the lower centre although there are some high spots in the upper centre as well
  6. Put in the streams and creeks.
  7. Put in the old roads. Fortunately, the PDF marks where they are.
  8. Put in the buildings. There are 4 of them.
  9. Review any existing images and see if I can figure out the fields and how they were delineated. Maybe also use Google Earth.
  10. I haven't decided whether I want to smooth out the contours using spackle. I think it depends on what I find in the previous step.
  11. Turf up the whole battlefield.
  12. Step back and admire.

Monday, February 6, 2017

Russian cottage from 4Ground

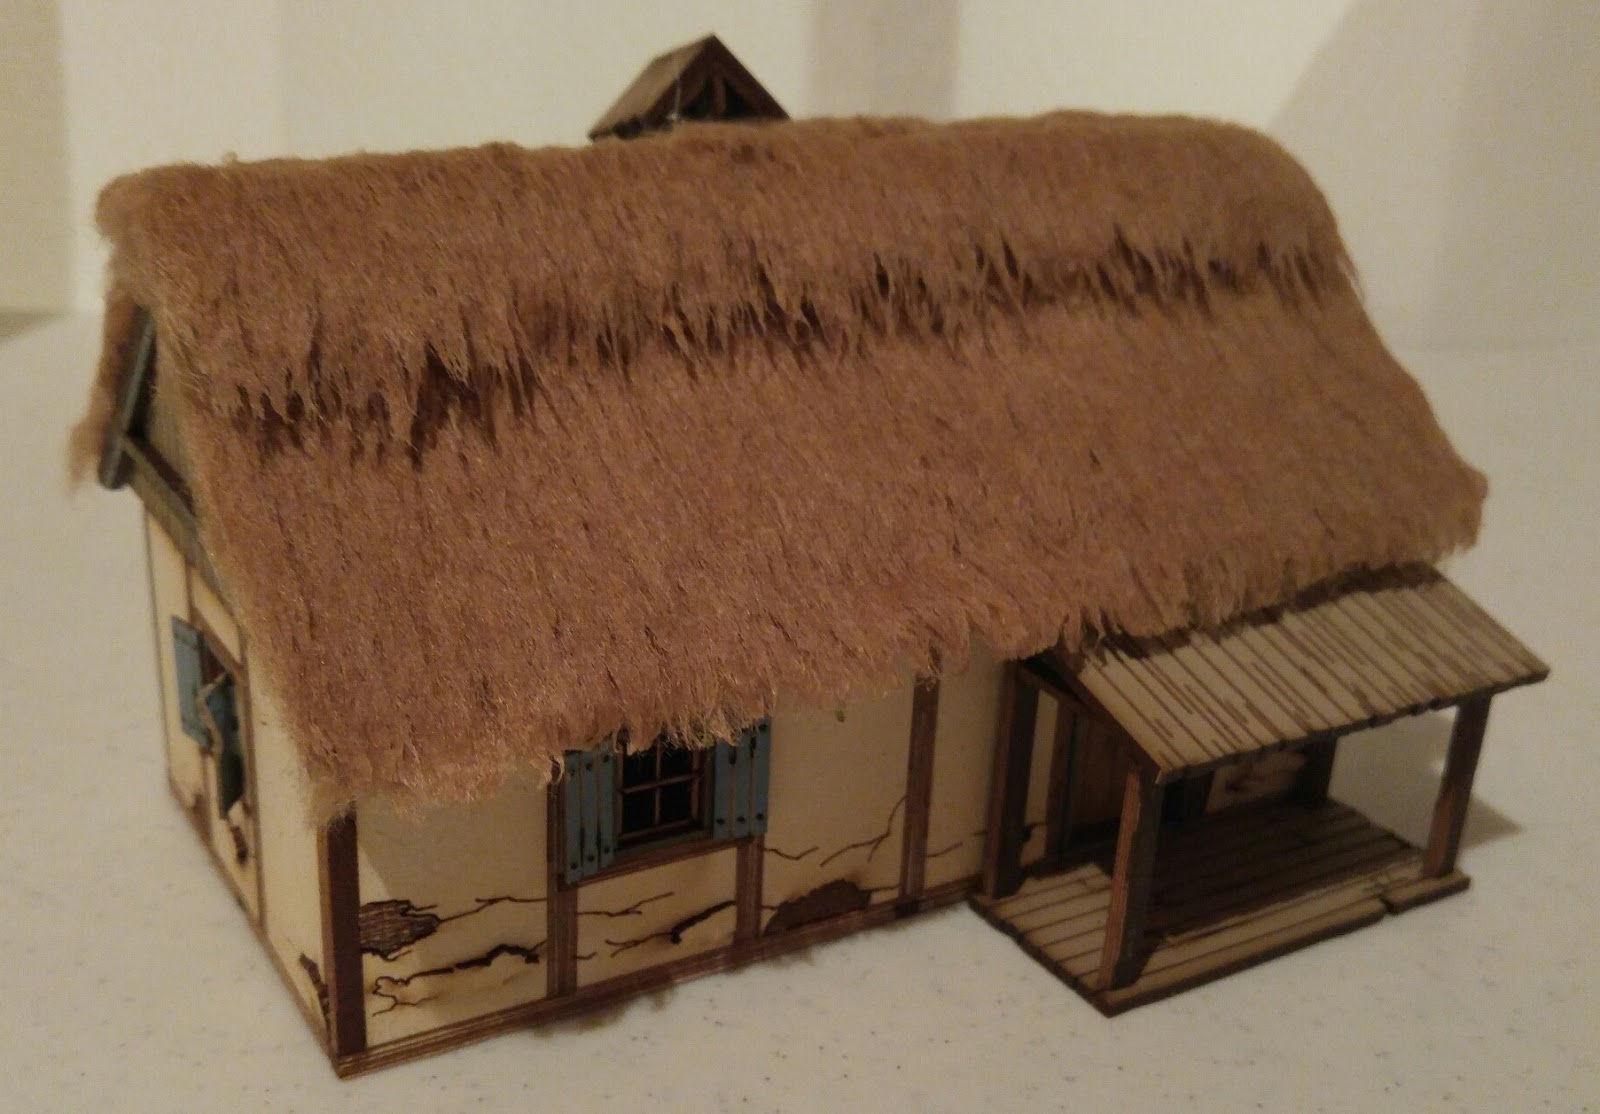
Having posted about the relative flatness of the Ukrainian house roof compared to the glorious furriness of the Russian cottage, I realized that I did not post any pictures of it. Here it is in all of its hairy glory:


And here's a pic of the inside.

I do have a couple things to note:

Pro tip #1: Don't just glue the chimney onto the fur and hope it stays in place. Actually make a hole in the fur to glue it solidly onto the MDF. Mine isn't going anywhere but it's not as flat as I would like. I'm not sure but I think the instructions called for cutting a hole and I ignored them. Sigh.

Pro tip #2: While it is nice to break up the flatness of MDF, glue the shutters back against the wall instead of having them stick out at a jaunty angle. They will be much more durable that way.

Thursday, February 2, 2017

Ukrainian house from 4Ground

I assembled this house a while back but haven't gotten around to posting about it until now. As with other 4Ground kits, it assembles nicely as long as you dry fit everything first and you follow the instructions.


These kits come with nice details inside and out. The shutters and the cracked plaster on the outside are a nice touch to add a bit of dimension.


But after the lushness of the fur thatch on the Russian house that I have, the absolute flatness of the roof is a bit disappointing. I guess I could add some really thin card over some of the scored planks and add some paint, but that's pretty far down the priority list. It still looks very good on the table.