Showing posts with label 6mm. Show all posts

Wednesday, February 23, 2022

Borodino: Practice for Hot Lead

Right flank French are repulsed from the redoubt and capturing Borodino on the other side of the river.
On Family Day, a group of us gathered to try out a scenario for Hot Lead. The scenario was a refight of Borodino on a grand scale using Sam Mustafa's Blucher rules.

The game is intended for 6 players at Hot Lead but we had to make do with two players a side. The set up had the Russians defending with scattered bits of corps, which were generally smaller in size to the French corps.

(Unfortunately, we forgot to take pictures until half way through)
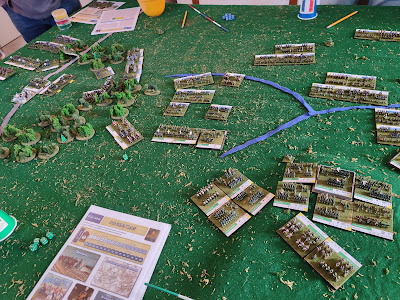

The game started with a general advance by the French across all fronts. The one difference was that a French corps on the other side of the river changed direction to cross back over the river, leaving one division and artillery to try to take Borodino, which was held by a Russian division.

Russian left where things were going well,until they weren't. French corps in middle being worn down
The Russian response was to advance and take a village on the left and generally get ready to receive the French. As the French closed, they suffered a couple of devastating cannonades followed by a couple of cavalry charges. This action disrupted the French attack on the centre-left, but didn't slow them down much on the centre-right.


The arrival of the French reserves made a huge difference on the far left, where the combined impact of French infantry, artillery, and cavalry began pounding the Russian forces. It was looking decidedly grim for the Russians by the time I left to return home. In the center-left, the Russians were doing well and were more than holding their own. The only real concern was the emergence of French cavalry from the woods and onto the left flank. I think the Russians could hold out with the arrival of a fresh division of cavalry and Russian guard. 

Just before the Grand Battery wipes out the French garrison in Borodino and the Russian cavalry charged
On the centre-right, the Russians hold the town and ridge were suffering from French bombardments and several divisions had to retire. However, the troops in the redoubt in front of the town managed to fend off two charges and looked to be able to hold for another attack or two. 

On the far right, the French managed to take Borodino, but suffered the loss of their artillery to marauding cossacks. The division that took Borodino was then wiped out by a couple of massive bombardments from a massed grand battery. The grand battery also hammered at the French hordes that were flanking the redoubt. A cavaly charge vapourized one French division and caused some of the horde to beat a hasty retreat.

When I left, the Russian left was in real trouble, the centre-left was holding out but there was cause for concern. In the centre-right, the Russians were being thinned down but still holding out. The real question was whether Kutusov's fresh infantry and the grand battery could deliver the hammer blow before the Russians gave out in the centre and far left. I'm not sure they could because there were still a lot of French troops there.

I had a lot of fun with this and we learned a few things about how to run the scenario in Hot Lead, so that is a bonus.

Monday, April 13, 2020

Gaming in the Age of COVID: What a Tanker

Robert (from Gaming on Vancouver Island) and I made contact and arranged to play What a Tanker! on Sunday evening. I had been working on my 2mm board, which we would repurpose for 6mm. Despite some initial technical hitches, we got rolling with Robert taking a Pz IV and me with a 75mm Sherman. We treated the brown areas as open terrain (though in hind sight, we should use them as light woods for cover) and I laid out some hedges and houses. I came in from the bottom and Robert from the top (beside the house). 

The first few turns were inconclusive as both of us had gunners who were obviously blind.  I was trying to maneuver and approach him and just as I was getting close, Robert did a blitz down the road, but missed on the flank shot.

Example of the blindness
Having exchanged ends, we blazed away at each other, slowly backing up as a result of damage.

 This lead to me to continue on my path into the field and eventually to near the house. Things looked grim for me as Robert gradually improved his aim and I got down to 1 die (2 permanent and 3 temporary damage). I managed to reacquire 2 of the temporary dice but I had suffered to hull critical hits. Things weren't going entirely Robert's way though, because I hit him for two critical hits (one hull and one turret) plus backing him up a few times as well.

After regaining all of my dice (actually 4), I managed to roll a magical 3, 4, 5, 4. The first hit bounce but the second one I rolled 3 6's and a 5. Robert rolled one 5 as a save, and his tank burned.

Thank you to Robert for a fun game.

Thursday, April 9, 2020

Test for 6mm WAT on a 2mm board

I dug out my 6mm terrain and minis just to see how they would look on my 2mm board. I have an upcoming game of What A Tanker! and I wanted to see how the terrain would work.

I think I will use some of my not quite finished Shermans and some not quite finished German tanks because I haven't based them. Even though I have used minimal bases, they still don't quite sit as well on the terrain as I'd like. If you are going to use contoured terrain like this, you might as well have minis that hunker down into it.

This doesn't mean that I have turned anti-basing on vehicles. I'm still planning on basing all of them because I use steel for the bases and I line my carry cases with that magnetic paper so they don't move at all. This preserves their paint job and also keeps those guns straighter for longer.

(Wow, I have a lot of Shermans! I must have more than 50 of them.)

As a bonus, I found four 15mm T34s I had forgotten about. My 15mm WAT collection just grew by 50%.

Monday, September 1, 2014

6mm Americans from Adler

I've had these little guys painted for a while now and they were documented in a previous and now defunct blog. But since I have this blog and I have some pictures of them, I might as well have a post about them here.

These are wonderful scupts. There's a lot of animation and detail in them as you can see in the following pictures. This is the same stand showing the front and back.


The webbing isn't painted on. That's detail that's on the miniature. All I did was highlight it with a bit of colour and use a black wash.

Here's what I mean about the character. Can't you just feel the determination oozing from the
tommy gunner?

Leon at Adler does a nice job of packaging his miniatures into useful groups. I ordered his engineers and they came with some flamethrower crews:


I've based all of these guys for BKC, so I've done some command stands for the CO and HQs. Here's one that features a GHQ Dodge command car as well as three Adler figures. The two on the left are yelling orders over the radio.

 Finally, here's just under half of my Americans.

Friday, March 28, 2014

Some 6mm WW2 German vehicles

A while back I posted these in another blog, but the host for that blog has vanished into the ether, so I'm creating a post in this blog.

First off, here are some command stands I created for Blitzkrieg Commander. The vehicles and figures are GHQ. As has been my experience with GHQ, the figures are nice enough but there's a really limited number of poses and really only one pose that can be used as an officer, so that's why you see a pointing officer figure on each stand.

Here's a Jagdpanzer IV. A nice GHQ model


Here's a couple of Stugs and a Marder. The Marder is either a very early GHQ model or perhaps even a CinC model. It doesn't have nearly the details that the current GHQ models have and it is distinctly smaller too. The Stugs are very definitely GHQ.

Lastly, a comment about these photos. They are definitely pumping up the red and green. In the "flesh" as it were, the orange is a darker orange brown and the flocking is not nearly so neon in colour. Also, the bright bits in the track area do not exist. I think they might be some camera flash.

Monday, March 3, 2014

Forest for the trees

A while ago, I picked up a pack of small tree armatures from Woodland Scenics. This is what they look like glued to their base and with the limbs bent. I was surprised by how easy it was to shape them individually.

Combine them with clump foliage, pennies for basing, some paint, and flock, and suddenly I have a 100+ tree forest:


Closing in the figures:


These are Adler infantry with a GHQ White scout car


Night Attack!


Friday, February 28, 2014

Bocage and Fields

I've done what many other wargamers have done. I've taken those green potscrubbers and turned them into bocage (in 6mm) or rough hedges (15mm). I start by giving them a rough cut and glue them onto some plasticard.


My variation is that I brushed them with glue and then dipped them in my flock mix. I shook my flock mix up before the dip so that a lot of the course flock came to the surface. That gives my bocage a more fluffy, less boxy look.


I made my fields by taking brown corduroy and semi-dry brushing it with cheap craft paint of various shades of brown.


Closer up with more of a miniature eye view: