Showing posts with label Projects. Show all posts

Monday, September 1, 2025

Pinned!

 I used my 3D printer to create some pinned markers. The first 4 were not successful because of various mistakes, but I fiddled with the model until it worked.

I then painted the metal of the tack silver, painted the body red, and painted the tops of the letters white. I put some watered PVA on the surface and dipped each one in fine turf.

A final step that I will do later is to spray a PVA water mix to seal everything down.

I'm pretty pleased with how they turned out.

Monday, February 24, 2025

1st Project With a 3D Printer

 So I got a 3D printer for Christmas. It's a Bambu Lab A1 Mini and it has been great. 


I've printed the obligatory Benchy (that's what it was doing above) and some accessories (printer poop basket, toolbox, and scraper). It's now time to put it to its true purpose: printing stuff for my miniatures.

I've had 300 15mm Zulus for a while and I've stagnated in painting them. I also recently (relatively) aquired The Men Who Would Be Kings rules. These rules use individual figures for casualties, so the obvious solution is to create movement trays for them, because why move 12-16 inividual figures when you can move just a couple of trays?

I've started with an artillery tray because it only have 4 figures on it. I have quite a few figure bases saved (courtesy of the Canadian government) and so I designed the stands to fit them. I should have enough to base all of my Zulus and British, but then I will have to look for alternatives for other periods.

 In TMWWBK, every unit has a leader, so I wanted to have a specific spot for him. I experimented with pausing printing and swapping from the grey filament to a white filament, and it worked reasonably well. The text a little smudgy, but it should look OK after I apply some flock and other terrain.

The leader also has a rating. But because the leader rating can vary from unit to unit, I didn't want to make it a permanent feature of the stand. Instead, I will be creating some labels and an area on the stand to put them. To keep the labels in place, I'm using mini magnets.

These pictures are showing my prototypes. I think I've got them pretty much dialed in to how I want them, so now I'll start cranking them out. I'll be  swapping out the grey filament for brown, and if I'm lucky I may not even need to prime the trays.

Any way, here's a more close up of the trays with some Zulus to show what the trays look like with figures in them. You can see the white letters aren't perfect, but they are definitely good enough.


Sunday, November 15, 2020

Gaming Stuff Packed

 Here is my miniature life reduced to a few boxes.

One big black box contains most of my Chain of Command 28mm miniatures and terrain. The only bits that it doesn't contain, trees and buildings, are in the grey box with the blue top. The other big black box contains miscellaneous gaming stuff including my lead mountain.

The white shelving unit is my bit box. It used to also contain my paints, which have been replaced by 15mm ECW figures and the forests and buildings of my 2mm board.

The yellow box and Mary Kay bag contain my 6mm figures and terrain, both finished and based and unfinished. The Mary Kay bag is seriously the best thing a miniature gamer could use for traveling to gaming events. It has 4 boxes on trays for miniatures to go in with slide out access. Rules will fit in front of the boxes. The top part (originally meant for lipsticks) can lift out and is where I put all of my trees in. I can put some tall buildings in there as well. The side pouches are nice areas to put gaming equipment in such as dice, measuring tapes, containers of tokens, and so on. The bag has both a nice carry handle and a good strap for carrying on your shoulder. 

And here is my travel boxes with reading material. Because I might not be able to get to the other miniature boxes for 6 months or so as they go into storage, I have some miniature supplies to tide me over. I packed my 15mm tanks in there, a whole bunch of toothpicks, stir sticks, and other bits of wood so that I can do some terrain crafting, especially when we self-isolate after moving. I also put my 15mm Americans in there just in case I feel like painting. Speaking of paints, that's what the tackle box contains.

I'm quite proud of how compact my collection is at the moment.

Tuesday, July 14, 2020

Problem with Panzers

So I've run into a problem with my plan to create transformable tanks. My suspicion that the German Pz III and Pz IV conversions were going to be tougher than the Allied tanks has proven to be correct.

The problem is that the guns come in pieces: a piece with the barrel (one for each type of gun) and a piece without (only one). I was hoping to drill out a hole in each piece and insert my magnets, but there just isn't quite enough depth. I tried replacing one of the magnets with a piece of steel, but it won't work.


I haven't given up on my plan though.

I'm going to attempt to cast the piece without the barrel. I'm going to create a mold and then use 5 minute epoxy to make enough parts so that each gun will have both parts. 

Wish me luck. My next posting with detail how I did it and how it turned out.

Monday, June 15, 2020

Crusader I, II, and III

Having finished the two Grant/Lee tanks, I decided that I would tackle the four Crusader tanks because they seemed easier than the German tanks. How foolish of me. 

The chassis went together nicely. My plan of adding the Crusader I MG turret worked out nicely. I just thinned out the plastic a bit to help the turret stick. It probably did not need it because I've found the magnets powerful enough to attract through at least one layer of plastic.


It was after I cut out the turret parts that I realized that magnetizing the options was going to be a bit more difficult than I had thought. There's two turret tops but only one turret bottom. So, to swap between the Crusader III and the earlier models, I would have to magnetize the top and bottom. And of course, the two turret tops have completely different hatches, with earlier versions having a slide top. And the Crusader I/II has two different types of gun, a 2lber and a 3" howitzer. 


18 magnets later, I have a completely swappable tank able to be Crusader I complete with auxiliary turret, a Crusader II, a Crusader II CS, and a Crusader III. 


At least I have a pattern to use for the remaining three tanks. I'm going to pay greater attention to polarity in this one so that all the parts will be swappable across all of the Crusaders. This is an extra pain but it will be a benefit when it comes time for gaming. I reckon that fiddling with polarity has added about 30% extra time, but I'm getting a bit smarter in dealing with it.

Thursday, June 11, 2020

Next Project: Tanks a lot!

 
I have plenty of tanks. But most of them are 6mm. I do have a very small number of 28mm tanks (2xT34 from two different manufacturers and of different sizes, a Hetzer, and a Sdkfz 222). The 6mm are fine for What A Tanker played on a small board via web cam, but they really don't cut it for a proper game. 

But I do have some 15mm tanks. I have 4 metal T34s of unknown origin, an ancient Battlefront T34 with a resin body and turret and metal accessories, and two sets of FOW El Alamein kits that I won while attending Trumpeter events. One came as a full game, the other was just the tanks.

After the extended time it took to do the 2mm terrain, I figure that doing 15 tanks was a more manageable goal within a reasonable time, especially when the all metal tanks are already done.

But I'm not going to limit myself to just assembling the plastic ones. Why build just a Grant when you can change the turret and have a Lee? Why bother with Buttoned tokens when you can button or unbutton the model?

So armed with some glue, about 260 3mm x 1mm magnets, some knives, a dremel, a drill, tweezers, some other tools, and a whole bunch of patience and ambition, I'm planning on making convertible tanks.

I started off with a Grant. Initially, I was just planning on making it buttoned/unbuttoned, but then I realized that the kit allows me to build as a Lee as well. (The instructions don't show how to build a Lee but the parts are there.) Had I realized before I started that you also had a choice of M2 and M3 for the 75mm sponson gun, I might have attempted to make that swap-able as well. On second thoughts, that might be more trouble than it's worth though.  

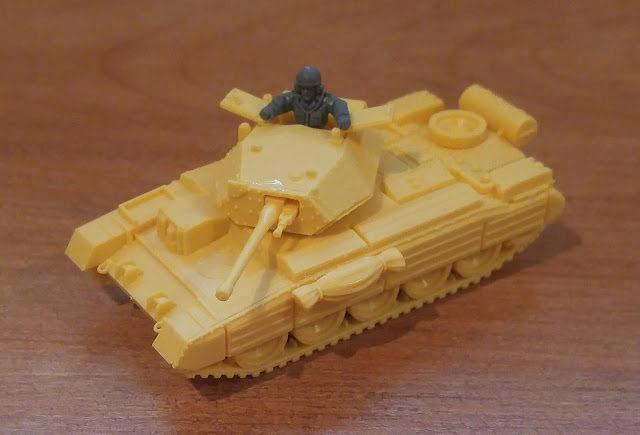
Anyway, here is the first tank:

This Grant is buttoned up but I can swap in the open hatch with commander. Or I can go with the Lee turret with the button or unbuttoned MG turret. Because I only have 6 British figures for 6 British tanks, I needed to make the command figures swapable too, and so I can move the commander to the open Lee hatch. The magnet that holds the open MG turret to the main turret serves a double duty as it also holds the command figure through a very thin plastic layer (you can actually see a bit of the magnet.

Tuesday, June 9, 2020

Project 2mm Terrain: Lessons Learned

So now that I am done with my 2mm terrain, what are my thoughts?
  • At times it was a slog, other times it was enjoyable. The toughest moments were half way through the contours, probably somewhere around the 120 foot mark. I had been creating elevations but was mostly just almost covering the previous contour. I enjoyed putting on the flock the most because of how good it made the board look.
  • I'm stubborn. Even though I knew my contouring was flawed, I kept consistent with my method even though it was not efficient nor fast.
  • In retrospect, I should have done a contour every 20 feet because that would have represented the actual slope of the land better.
  • I might not do contours next time. Instead, I'll do smoothed hills. That being said, I think the contours worked pretty well for this board.
  • Stupidly, I didn't bother using Google Earth to look at the terrain until I nearly completed the contours. I guess I got excited by having a good contour map to look at and just didn't consider the vertical scaling.
  • There's a number of maps of Gaines Mill and other than all of them agreeing that Boatswain's Creek being wooded, they didn't agree much with the placement of other woods and swamps. In the end, I use the contour map for the Boatswain's Creek woods and another map for the other woods. I also extended the Boatswain's Creek woods and swamp based on the description of the battle. I figured the D.H. Hill probably had a good reason not to just immediately attack the far left of the Union line, so I gave him that reason with that terrain. 
  • Looking at the actual contours, the positioning of some of the Union units makes little sense, particularly the artillery, so I moved them a bit for my recreation shots. Accounts of D.H. Hill coming under long range artillery fire is only possible if the batteries on the Union left are on the ridge line and not in the valley where the map has them.
  • The 3mm x 1mm magnets I bought (300 for $15CDN) work just great for placing the buildings.
  • It will be quite a while before I do any more 2mm terrain. I do have some buildings, walls, and tree castings I can paint.
  • If I do another board like this, it will probably be for Antietam (or part of it because that is a pretty big battle).

On to the next project. Let me give you a hint:


Thursday, June 4, 2020

Project 2mm Terrain: Done!!!!!

It's done! Finally finished!
I had a momentary bit of panic when I could not find my 2mm figures. While it's distressing to search and search for something, there was some good that came out of it: I did a little reorganization of my hobby desk/storage, cleaned out one more bin of hobby stuff, found some more 2mm terrain bits, and  found another 15mm tank that I can use for What A Tanker!. 

So in celebration of finishing the project, I put my newly found figures onto the terrain board. The stands represent roughly the positions in the battle of Gaines Mill 1862 at 2:30pm. I didn't put troops in the woods, but I could have because the woods are removable (as are the buildings). As my figures are based according to Antietam and for a different corps, the regiment names don't correspond to the regiments in the battle.

Anyway, here for you enjoyment are some pix:

Gregg's Confederate brigade emerging from the woods to attack Warren's Union brigade

View from above showing Gregg disguised as Wilcox and Warren disguised as Brooke

A third view of the action

From the Confederate viewpoint

DH Hill's division arrives on the far left of the Confederates
View of DH Hill's arrival in Old Cold Harbor. He would continue in this direction until he arrived on the flank of Gregg

Buchanan observes Hill's arrival with a protective swamp to his front

In the centre, Branch is launching his attack to support Gregg to his left. On the right, is Field. On the other side of the creek, Lovell's Unionists await in the woods.

Porter commands from near the Adams farm. Gregg's attack is in the background to the right. Directly ahead is the rear rank of Lovell's brigade.

To Porter's left, Martindale makes his headquarters in Watt's house. Most of his troops are dug in half way up the bank of Boatswain's Creek. To the left of Martindale is Butterfield.

A shot showing Field's Confederate brigade in the centre advancing in the woods of Boatswain's Creek. To his left is the second rank of Branch's brigade and behind him, partially obscured by woods is Pender. Powhite Creek is in the foreground and to the right.

Pender's brigade following Field's.

Tuesday, May 26, 2020

Project 2mm Terrain: Update 12

The end is nigh! I've done the swamp, completed the woods, and finished the buildings. The penultimate step I've just completed: giving everything a good spay with a Mod Podge and water mix to stick everything down and seal it.

The final step is to paint the frame just to make it look good. I've got some nice grey house paint that should do the trick. It won't take much time to do.

So here's an other teaser shot of the terrain to whet your appetite. My next posting will have a bunch of glamour shots showing the final board, complete with detachable forests and buildings and with my 2mm miniatures in roughly the Gaines Mill deployment.

Thursday, May 14, 2020

Terrain Teaser

I've made a little progress on my 2mm terrain, but not enough to justify a full update. I now have some buildings I can put on the board. The buildings have magnets embedded in them so that I can add or remove them as I want. I need to seal and paint them.

House and barn
I experimented adding a thin black wash to darken some trees and some thin yellow to lighten some. The black worked but the yellow didn't really.

Monday, April 27, 2020

Project 2mm Terrain: Update 11

With the end in sight, I'm making a determined effort in the three remaining areas:
  • Woods
  • Swamp/bog
  • Buildings
I was going to do some planted fields but I think I'm going to leave them out so that the terrain is a little more reusable. With magnetized buildings that I can remove, the board can also be used for 6mm as well as 2mm.

For the woods, I was hoping to use something like paper, which would be flexible so that the contours would show up. Instead, I am using just plain foam core that I've piled up with clump foliage.


(I'll add clump foliage to the sides, but it is not sticking quite as well as I had hoped. It's going to take a couple of passes, I think.)

I encountered a problem with warping with my first test piece but I think I can bend it into submission. The problem of having too even of a colour for the trees I think I will fix by some creative other flocking and also by a little staining and painting after I've sealed them with a coating or two of diluted Mod Podge. Scattering some clump foliage randomly around the board will also help tie the whole board all together.

I have also broken up the woods into clumps so that I can remove just the bits I need. 
I will use magnets so that the forest clumps stick a bit to the board so that I can remove them as needed.

I'm hoping to complete the woods by the end of the weekend, but I'm probably optimistic about that.

Thursday, April 9, 2020

Test for 6mm WAT on a 2mm board

I dug out my 6mm terrain and minis just to see how they would look on my 2mm board. I have an upcoming game of What A Tanker! and I wanted to see how the terrain would work.

I think I will use some of my not quite finished Shermans and some not quite finished German tanks because I haven't based them. Even though I have used minimal bases, they still don't quite sit as well on the terrain as I'd like. If you are going to use contoured terrain like this, you might as well have minis that hunker down into it.

This doesn't mean that I have turned anti-basing on vehicles. I'm still planning on basing all of them because I use steel for the bases and I line my carry cases with that magnetic paper so they don't move at all. This preserves their paint job and also keeps those guns straighter for longer.

(Wow, I have a lot of Shermans! I must have more than 50 of them.)

As a bonus, I found four 15mm T34s I had forgotten about. My 15mm WAT collection just grew by 50%.

Sunday, April 5, 2020

Project 2mm Terrain: Update 10

Last week, I hurt my back while trying to suppress a sneeze because I was holding my dog at the time (ridiculous as this sounds) and I didn't want to drop her. It got worse Thursday and Friday, but with drugs and ample use of a TENS machine, on Saturday I felt pretty decent so I thought I could flock my board as a relaxing afternoon diversion.


I'm pretty happy with the initial flocking. There's plenty of helpful Youtube content out there on how to flock and armed with that knowledge, I put down this first coating for the general fields. The dark patches are going to be heavy woods and I'm thinking a mix of coffee grounds and a dark green flock will be good to represent this terrain, plus eventually a canopy of coarse turf as the tree tops. The medium brown represents bogs and marsh and I'm thinking about using some static grass and coarse dark green turf for that.

I think I do need to consult with Lukes APS, Mel the Terrain Tutor, and maybe some others because I'm not sure whether I seal this layer and then do another or just keep layering on and then seal.

I may have overdone things on Saturday because my back is a bit sore this Sunday. I did take some pix and post them because I'm happy with the progress.

Monday, March 30, 2020

Project 2mm Terrain: Update 9

Now that renovations have finished, I got a little time this weekend to do some miniatures stuff. I got the urge to work on my terrain board. I was hoping to start flocking it but instead I'll settle for blocking out the heavy woods, swamp, and other terrain, because white background is the devil when it comes to flocking.


One of the reasons I had problems is that I discovered that I only have 2 inch brushes or 00 brushes. Nothing in between. So it meant slathering on with the big brush and then having to use the small brush to put in the edges.


Nevertheless, this is progress!

I must say the board looks radically different with the contour lines now blending in.

Monday, February 24, 2020

Project 2mm Terrain: Update 8

The project has taken a back seat to house renovations, and as a result, I've lost a lot of momentum and my will to complete it has fallen off quite a bit. Perhaps documenting where I'm at will help me get my mojo back on this.

Basically, I have completed the terrain elevations. I have also put some boards around the outside, which cleans up the edges and provides support and rigidity.


I have partially sealed the entire thing but I think I will wait until I get to some Mod Podge to do the job properly. I have to see how much dirt brown paint I have because I want to paint the entire thing with three different browns: regular dirt, a darker shade for swamp and bog, and a different brown for forested areas.

Once I have that done, I can put the roads in and flock it. Then it will be about putting in buildings and fences and other features.

Thursday, October 17, 2019

Project 2mm Terrrain: Update 7

Woooo Hooo!

✅ 80 ✅ 90 ✅ 100  ✅ 110  120  130  140  150  160  170  180  190

I've completed all the hills on the board! It took a lot longer than I expected but I did get faster as I went along.


Here's the board almost complete with just the corner to go. I finished it the next night. Despite each contour being only 1mm, there's some really substantial valleys in the board.

Things I learned

Well, I've learned a few things that, if I ever do this again, I would do differently:
  • Not do every contour line. I would just do every second contour using the foamcore and use polyfilla to smooth out the contour lines
  • Put reinforcing bars. About half way through, the board started to warp and it's now at about 1/2 inch on both ends. 
  • Cork is a neat material to use. I would use it more often for contouring because it is easy to cut using scissors, flexible, and resists compression. It is pretty expensive if you need to use a lot.

What's next

  1. Add some 1x1 bars to the back to straighten it out.
  2. Since I have decided to keep the contours showing, trim some of the paper overhangs so that all of the contours are clean.
  3. Seal the board so that it won't absorb water when I flock.
  4. Mark the locations of the waterways, roads, and buildings.
  5. Figure out how tall to make the trees.
  6. Figure out where to put the woods and how to do them. One woods is marked on the board. I've seen another map with woods in other locations.

Saturday, September 7, 2019

Project 2mm Terrain: Update 6

✅ 80 ✅ 90 ✅ 100  ✅ 110  120  130  140  150  160  170  180  190

That's another 2 levels done. The next set of two are the trickiest in terms of complex shapes but after that, the hills smooth out and take up less overall terrain.


The more I think about it, the more I'm inclined to keep the contour lines. I won't be saving any time because I would need to clean up the paper overhangs, but I think it will perform better as a gaming table, even if it is not quite as "realistic". There's a kind of honesty to keeping the construction method exposed that I'm appreciating.

(I really need to get a new phone. These are terrible pictures)

Sunday, September 1, 2019

Project 2mm Terrain: Update 5

✅ 80 ✅ 90 ✅ 100  ✅ 110  120  130  140  150  160  170  180  190 

Woo Hoo! I have the wind at my back and things are progressing nicely. I've just completed up to the 120 foot contour. It's this contour and the next two that are the most complex, large, and fiddly. The pinning technique is working brilliantly and it's helping to speed things up.

I'm currently waiting for the glue on the second part of the 120 to dry so that I can trim off the excess. So I thought I would take some time while the glue dries to do this update. Sorry, no pix but they really wouldn't show anything.

I've been watching Luke's APS channel on Youtube and it is brilliant in how he shares his techniques. Yes, he pushes his products but that is redeemed by how he reveals how he actually makes his products and how he uses them and how he uses competing products. From his one-day builds, he's given me an idea on how to finish and protect this project. If I can find it cheap enough, I'm planning on using a deep picture frame, turn it upside down, and insert the terrain. If I can't, I'll have a go at making the equivalent.

Wednesday, August 28, 2019

Project 2mm Terrain: Update 4

Well, I have now completed the hills on the extreme left of the battlefield, where the initial Confederate thrust came from.

I'll confess that my slow progress has mainly come from a lack of motivation, slow progress, and how fiddly the whole process has been. But last night, I had a brain wave. Since I am using foamcore and cork as my materials, I can just pin the terrain in place until it is dry. All of a sudden, the fiddliness has gone away and it's just become a matter of cutting the pieces out, gluing them, and pinning them in place.

Completing the western hills represents only a small fraction of the entire battlefield but doing something and having it come out looking really good has raise my morale and now I want get the rest done.

I was toying with the idea of smoothing out the contours but now I've gone the other way and I'm thinking I might keep them. I might do some experimentation before I decide.

Wednesday, July 17, 2019

Project 2mm Terrain: Update 3

✅ 80 ✅ 90 ✅ 100  110  120  130  140  150  160  170  180  190 

I have now done the 90 foot contour and the 100 foot contour. The one change to my plans is that I've ended up gluing the paper pattern I used to cut the contours back onto the elevations. I think it will help me with positioning the roads, buildings and creeks later on.


I'm liking how it is looking but it is much, much slower going than I had anticipated. And it will get a lot worse too because the two levels that I did are likely the easiest ones to do. The next 2 levels will be the worst.

There are two "islands" on the left side and I've got one in the above shot. I'm going to the much larger one next and build it up to its apex of 170 feet because it will be useful practice for the rest of the board. I've already learned that I need to cut inside the lines and I shall learn a few more things as I go.