Tuesday, February 17, 2015

Barbed wire fence 2.0

Based on feedback from the useful chaps at the Too Fat Lardies forum, I've doubled up the bottom coils. The easiest and quickest barbed wire obstacle is to lay two coils of barbed wire beside each other and then stack a third coil on top. That's what I've done by retrofitting the third coil to most of my fences.

I've also created a sign post using my trusty label maker.

Friday, February 6, 2015

Barbed wire fence

Having bashed out some simple fences and minefield markers, it's on to a slightly more complex build: barbed wire fences. For these, I built my simple fences but left the wire untied on the ends. I then wrapped my 30 guage florist's wire around a pencil. When I slid the wire off the fence, I have the coils for the barbed wire. I cut the coil in half so I have some on either side of the middle post. I then threaded the fence wire through the coil and tied it off. That's more or less it.

 It's a bit fiddly and not as imposing as the real thing, but if you double them up, you get a pretty substantial barrier.


Florist's wire is pretty much perfect for the job. It's easy to bend but substantial enough that it will stay in shape you bend it into.

Monday, February 2, 2015

Minefield marker


In Chain of Command, you can buy 6" square minefields. Fortunately, the tongue depressors I bought are 6" long. So I printed out a sign using my DYMO label maker (it even has the skull and crossbones symbol), pasted it on a small piece of plasticard, and put the sign on a post.

The post and the rest of the tongue depressor are just variations on my fences.

Friday, January 30, 2015

How to fence

Here's my basic steps for creating fences for 28mm figures:

Materials:
  • 6" large tongue depressors
  • Matchsticks
  • White glue
  • 30 gauge florist's wire or similar. The florist's wire is thin and flexible enough to bend easily but it's quite sturdy
  • Brown craft paint and mid-grey paint
  • Turf mix (mine started out as 2 parts fine to 1 part course but I think there's far more fine now)
  • Optional: scalpel or chisel-blade for an exacto knife
Steps:
  1. Start by drilling 3 holes into the tongue depressors. The holes should be slightly smaller than the matchstick.
  2. Dab a bit of glue on one end of the matchstick and stick it into the hole. If the hole is slightly smaller, you might have to rotate the matchstick a bit to knock the corners off to get it into the hole. The tighter the fit, the better. Repeat for the other two holes.
  3. When the glue is dry, use the scalpel or chisel blade to flatten the bottom if the matchstick pokes through a bit.
  4. Slap the brown paint over the entire construction.
  5. Take about an 8" length of wire and curl a little hook into it. Put that on one of the end posts and then wrap the wire so that you have complete loop.
  6. Keeping some tension on the wire, loop around the middle post and then loop around the other end post. Snip off the excess. Dab a little white glue on the loops to keep things in place. If you have bit sticking out from the snip, encase it with white glue.
  7. Add a second wire to the fence repeating steps 5 and 6.
  8. Cut the posts just above the upper wire. Paint the ends brown
  9. Take some grey paint and dry brush the grey on keeping some of the brown exposed in lower areas.
  10. Apply white glue to the brown tongue depressor.
  11. Apply your turf mix to the glue.

Tuesday, January 27, 2015

Fencing

Time for some crafts. I've started to create some fences for my 28mm figures. Here is the first couple, which are simple "Do not trespass" style wire fences. In Chain of Command, they might prevent "on the double" movement but that is about it.


On the second fence, the post snapped as I pulled the wire tight. So we have a broken fence instead of a fully intact one. Not a problem.

Sunday, January 25, 2015

Objectives for 2015

This is usually something that you do for the first few days in the new year, but I'll do it now.

These are the things I want to do for 2015 but not necessarily in this order:
  • Finish the supply train and camps for my 2mm ACW armies
  • Work on my Adler 6mm Germans. I have a lot so completing them is not realistic
  • Try and finish all of the 6mm vehicles that Stephen gave me to paint plus all of my vehicles
  • Create barbed wire obstacles,for 28mm figures
  • Create minefield markers for 28mm figures
  • Create bocage and hedges for 28mm figures
  • Create trees for 28mm figures. I now have the armatures and clump foliage
  • Cut up a cobblestone mat to create city roads for 28 mm figures
  • Repaint and rebase the pine trees for 28mm figures. These are Christmas diorama trees that I picked up for half price.
  • Create more smoke markers
  • Create explosion markers for 28mm figures
Plus I want to pick up some more 28mm Russian troops, a 28mm Russian AT gun, some 28mm Germans, some MDF buildings, and anything else that strikes my fancy.

Sunday, November 30, 2014

Campaign for Big CoC

A couple of weeks ago, we kicked off a Chain of Command campaign using the Big rules for Chain of Command. It was Canadians vs the 12th SS in a slightly shorter -2 to 4 campaign ladder.

Game 1


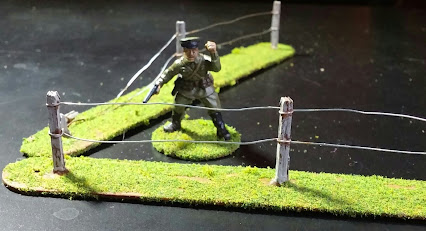
The first game was a shortish affair in which the Germans thoroughly out-scouted the Canadians. In this pic, the Germans started from the right.

While the Canadians tried to push hard on the flank, the Germans went straight up the middle and managed to get a jump off point close to the Canadian side and forcing the corresponding Canadian jump off points back to the table edge.


 The Canadians sent a section on the left flank and also sent a section against the German JOP in the center. A bold gambit to seize the JOP went badly as Richard rolled miserably for movement.


The Germans countered with an MMG. David didn't roll particularly well, so he added a squad (for 24 D6 of firepower).


After taking casualties in one section and accomplishing very little on the flank, the Canadians smartly withdrew.

Chalk one up to the campaign effect, in which the Canadian's chances of winning were small and the price would have been heavy regardless of outcome, so the effort was cancelled.


Game 2


With the campaign initiative, the Germans elected to strengthen their defenses. The initiative passed back to the Canadians. We rearranged the terrain a bit to reflect a slight change in the axis of the Canadian attack.

In this picture, the game is already several phases old. Ray deployed one section in the lighter green woods.


Stephen and David countered by deploying four sections against him. The weight of all that fire (half at close range) broke Rays section after a couple of phases. Ray deployed a second section that eventually suffered the same fate.


But the Germans had fallen into a trap. I was running the attached troops and I had selected a section and a FO. I deployed both of them and in a couple of phases had two German squads under a mortar barrage. The next phase, I moved it over 6" and added a third squad and one soldier from the fourth. The effect was devastating to the German squads as they all took some casualties.


Meanwhile, on the left, Richard had deployed a section, which prompted Stephen to deploy a squad in the center. I added a Sherman to turn the long range fight into a more equal affair. 


The Sherman's HE proved to be the difference maker so Stephen deployed a 'Shrek team. It's one shot immobilized the Sherman. It didn't get a second shot. The Sherman was immobilized in a good position where it could intervene in the center or on the right.

With the German center and right losing their firefight and still being a bit shaken with how devastating the mortar barrage had been on the left, the Germans elected to preserve their manpower and withdrew.

Game 3

The Canadians decided to advance on the main line of resistance. Having two sets of replacements available, the Canadians used one to top off their sections to bring them close to full strength. The Germans declined to use their one replacement draft. Once again, we rearranged the terrain a bit and added some hills and buildings.

I started off by deploying the tank and putting it on overwatch. Ray deployed a section on the right and started advancing through the woods. Richard deployed a section on the left, but due to poor scouting, he was once again forced to start from the edge. However, this wasn't as bad a disadvantage as previously because the German JOPs were a distance away and not in direct sight.

Stephen brought on the 'Shrek team again but this time they were far more successful. 9 hits out of 13 meant I didn't even need to make any defense rolls. Bye bye Sherman.

However on the right, Stephen deployed a German squad to stop the Canadian advance. Ray countered with a second section to make the dice thrown by both sides fairly even.


But the weight of numbers (and some better die rolling too) soon began to tell as the shock piled up on the ever shrinking German squad. Ray ordered up some close combat and that was the end of the German squad.

Meanwhile, on the left, David's Germans began a leisurely advance against Richard's Canadians hunkered down in the woods. Being in cover and tactical helped slow down the casualty rate and bringing on other units help whittle down the German attackers.


But there was an ominous clanking sound in the distance as a PzIV made its way onto the battlefield.

It was targeting Richard's Canadians when the tank commander got word to withdraw. Alarmed with Ray's progress towards the German JOP on their left, the Germans elected to fall back.