This beer offers a bunch of variations on the theme "a little bit more" compared to the standard lager. It's a little more golden. It's a little more sweet on first taste. It's a little more bitter on the finish.
It's a little more educational too. This is one of the beers brewed by students at Niagara College. While I found the other beers that I sampled a bit on the hoppy bitter side, this one I found more balanced and enjoyable.
Friday, March 6, 2015
Friday, February 20, 2015
Trees for 28mm
I picked up a couple of packs of tree armatures and clump foliage a month ago. Both things are from Woodland Scenics. Here's what an armature looks like out of the bag:

I twisted the branches to make them tree dimensional, glued the trunk to its base, and then glued the base to a steel washer:
 Glue clump foliage to the branches, glue and dip the base into my turf mix, and you have a tree. I do find it surprising how long it takes to do one tree but the effect is rather pleasing:

I twisted the branches to make them tree dimensional, glued the trunk to its base, and then glued the base to a steel washer:
Tuesday, February 17, 2015
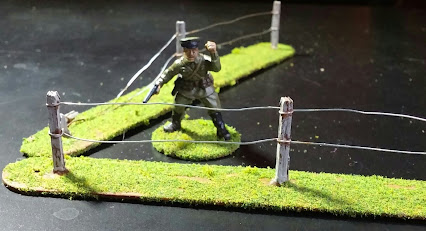
Barbed wire fence 2.0
Based on feedback from the useful chaps at the Too Fat Lardies forum, I've doubled up the bottom coils. The easiest and quickest barbed wire obstacle is to lay two coils of barbed wire beside each other and then stack a third coil on top. That's what I've done by retrofitting the third coil to most of my fences.

I've also created a sign post using my trusty label maker.

I've also created a sign post using my trusty label maker.
Friday, February 6, 2015
Barbed wire fence
Having bashed out some simple fences and minefield markers, it's on to a slightly more complex build: barbed wire fences. For these, I built my simple fences but left the wire untied on the ends. I then wrapped my 30 guage florist's wire around a pencil. When I slid the wire off the fence, I have the coils for the barbed wire. I cut the coil in half so I have some on either side of the middle post. I then threaded the fence wire through the coil and tied it off. That's more or less it.

It's a bit fiddly and not as imposing as the real thing, but if you double them up, you get a pretty substantial barrier.


Florist's wire is pretty much perfect for the job. It's easy to bend but substantial enough that it will stay in shape you bend it into.
It's a bit fiddly and not as imposing as the real thing, but if you double them up, you get a pretty substantial barrier.
Florist's wire is pretty much perfect for the job. It's easy to bend but substantial enough that it will stay in shape you bend it into.
Monday, February 2, 2015
Minefield marker

In Chain of Command, you can buy 6" square minefields. Fortunately, the tongue depressors I bought are 6" long. So I printed out a sign using my DYMO label maker (it even has the skull and crossbones symbol), pasted it on a small piece of plasticard, and put the sign on a post.
The post and the rest of the tongue depressor are just variations on my fences.
Friday, January 30, 2015
How to fence
Here's my basic steps for creating fences for 28mm figures:
Materials:
Materials:
- 6" large tongue depressors
- Matchsticks
- White glue
- 30 gauge florist's wire or similar. The florist's wire is thin and flexible enough to bend easily but it's quite sturdy
- Brown craft paint and mid-grey paint
- Turf mix (mine started out as 2 parts fine to 1 part course but I think there's far more fine now)
- Optional: scalpel or chisel-blade for an exacto knife
- Start by drilling 3 holes into the tongue depressors. The holes should be slightly smaller than the matchstick.

- Dab a bit of glue on one end of the matchstick and stick it into the hole. If the hole is slightly smaller, you might have to rotate the matchstick a bit to knock the corners off to get it into the hole. The tighter the fit, the better. Repeat for the other two holes.
- When the glue is dry, use the scalpel or chisel blade to flatten the bottom if the matchstick pokes through a bit.
- Slap the brown paint over the entire construction.

- Take about an 8" length of wire and curl a little hook into it. Put that on one of the end posts and then wrap the wire so that you have complete loop.
- Keeping some tension on the wire, loop around the middle post and then loop around the other end post. Snip off the excess. Dab a little white glue on the loops to keep things in place. If you have bit sticking out from the snip, encase it with white glue.
- Add a second wire to the fence repeating steps 5 and 6.

- Cut the posts just above the upper wire. Paint the ends brown
- Take some grey paint and dry brush the grey on keeping some of the brown exposed in lower areas.
- Apply white glue to the brown tongue depressor.
- Apply your turf mix to the glue.

Tuesday, January 27, 2015
Fencing
Time for some crafts. I've started to create some fences for my 28mm figures. Here is the first couple, which are simple "Do not trespass" style wire fences. In Chain of Command, they might prevent "on the double" movement but that is about it.
On the second fence, the post snapped as I pulled the wire tight. So we have a broken fence instead of a fully intact one. Not a problem.
On the second fence, the post snapped as I pulled the wire tight. So we have a broken fence instead of a fully intact one. Not a problem.
Subscribe to:
Comments (Atom)