So for the February edition of Trumpeter, I played in a game of General D'Armee. It was a refight of Quatre Bras with an Anglo-Dutch force trying to prevent the French from capturing the crossroads.
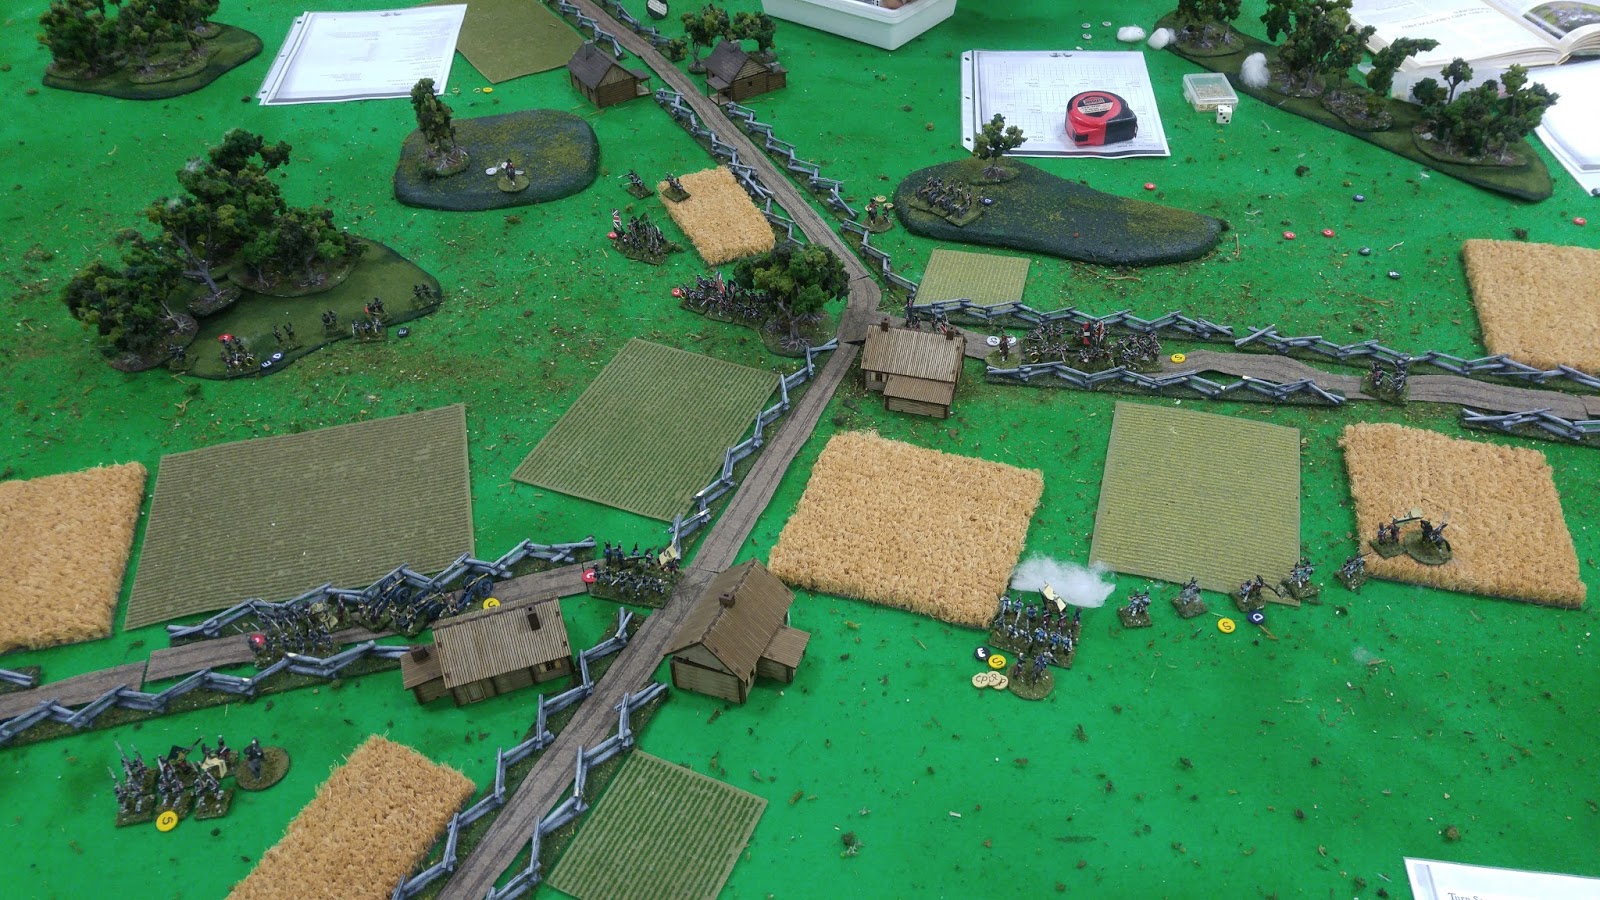
I took the Dutch brigade on the right consisting of 2 regular battalions, 2 green battalions, a battery, and 3 stands of skirmishers. My right was anchored on woods and to my left was a British brigade. Facing me was a brigade with another one pointed at the junction between me and the British brigade.
We got the initiative and immediately I sacrificed one of the green battalions to reinforce the skirmish screen. If I hadn't, I think I would have been overwhelmed quickly. The opening cannonades played havoc with the packed French deployment (lots of high die rolls) and the skirmishers also did quite well.
As the game progressed I gave ground slowly and the French artillery began to take its toll on my line troops. Additionally, my artillery eventually succumbed to skirmisher fire. Fortunately, they had taken quite a toll on the French before they quit the field.
(I had a picture to insert here but it has disappeared. I may have accidentally deleted it)
Meanwhile, on my left, the British brigade had been doing reasonably well holding up the French but they were being threatened by a small cavalry brigade to their left rear. At this point, our reserve brigade made a timely arrival after marching rapidly across from right to left. Using a forward tasking, they launched a long distance charge with the two attached cavalry regiments. We had a slight disadvantage going in but rolled sufficiently well to get into combat. At this point, the Dice Gods deserted us. Throwing 10D6 with a 4-6 meaning a hit, we could only cause two casualties. Coming back was 6D6 that caused 5 (I think). Our cavalry returned from whence it came.
Meanwhile, an elite British battalion charged a hesitant French column. The French player rolled a 12 and caused 3 casualties and morale test, which the British battalion promptly failed. At least both brigades passed their faltering check (as I did too when I lost my battery).
At this point, the game was called with a marginal French victory because they had the crossroads. A fair enough result because, short of a drastic change in luck, the French were grinding the Allies down anyway.
I really like these rules. They move deceptively quickly (in that while movement rates aren't that high, there's definitely the ability to close rapidly and get stuck in), there's a lot of command choice, and losing even a single unit can really hurt. I have the similar Pickett's Charge but I haven't fully read them yet. I can't wait to try them out, once I have figures for them.
Thursday, February 28, 2019
Tuesday, January 1, 2019
An apology and New Year's resolutions
I can't believe that it has been 18 months since my last post. It's for this long long pause in posting that I am apologizing for. I've been meaning to post for quite a while now but somehow I never got around to it. I'm sorry.
I guess I should explain some of the reasons for the absence. Shortly after my last post, I returned to Ontario to pack for our long journey to BC. We arrived and survived in a small 320 square foot apartment for the rest of 2016. Let me tell you that I am not cut our for tiny house living. It's also pretty devastating for my miniatures hobby because I had to leave them in storage.
We bought a house in Abbotsford and moved in over the month of December. My miniatures have a home in the nice finished basement and all my books that I kept are up on shelves where I can access them. However, it's an older home and we've ended up doing a lot of renovations. The renovations have chewed up quite a bit of time but they are coming to an end. I just have the stairwell left to patch and paint.
On to the resolutions; in 2019 I resolve to:
- Post at least once a month in this blog. I won't count this one for January though.
- Create terrain that I can use for my 2mm ACW figures. Maybe my next post could describe my plans for this.
- Write a set of rules for an age of sail game. I have been mulling a few ideas in my mind and I think it's time to put pen to paper, as it were.
- Paint more 6mm WW2 figures.
Friday, July 7, 2017
Trumpeter in June
Having done two back-to-back naval games, I thought it would be a good idea to switch things up a bit at the next Trumpeter meeting. That's how I ended up playing War of 1812.

We used a set rules called Land of the Free. Let me start out be saying that I'm not really a fan of what I've seen in these rules. Maybe we made some fundamental mistakes but it seems like units can do a lot of things in a turn, like shoot three times. Now I'll concede that I had really crappy die rolling (I think I only passed morale checks for the artillery all game) and that definitely played a role in how I view these rules. I do think a game should be able to compactly summarize itself into 2-4 quick reference pages. For some reason, these rules use 6 pages and there's no reason they shouldn't have been on 4.
Let me explain what happened prior to the picture. On the left, not much happened all game. I advanced three units to the fence and I was content to leave them there to protect my left and the guns. You are seeing it beginning to crumble because I could not make any morale rolls and my units had to retreat.
On my right, I sent an entire brigade of a large unit, a unit of skirmishers, a medium unit, and a small militia unit vs one large unit (plus one 1/2 unit that could fire out of the house). My skirmisher went first and had no effect but they were driven back. Next turn, I advanced my medium unit and my large unit. The British responded with delayed fire and naturally drove my medium unit back before I could fire myself (reasonable enough, I suppose). My large unit fired twice with little effect, mostly because of crappy die rolls. The British won the initiative and fired three times on my large unit. Each fire was 8 dice and hit on a 5-6. That's basically 2-3 hits per firing and every 4 hits drops the unit's morale by 1. Combine that firepower with my miserable die rolling for hits and morale and I didn't achieve anything. It wasn't until I managed to sneak a small unit of militia onto the road that I managed to get enough hits on the British unit to drop it a level of morale.
Shortly after this photo, my two American units routed leaving only the militia behind. It was at that point, we called the game.
To me, these rules seem too fiddly for playing a lot of units but they also seem to need a lot of units to smooth out the swings in luck. But I'd be willing to give them another go just to see if knowing how they work would improve how they play.
Sunday, June 25, 2017
Gaming at Craig's
I had enjoyed playing in a naval game at the May Trumpeter. I was happy that they invited me to join them in their regular gaming every Friday. So off I went the following weekend to yet another naval game. This time, it was WW2 with a semi-home brew set of rules call (I believe) Steel Fleets.

Once again, I took the van but being a little smarter, I choose to try to keep the distance open a bit since we were outgunning our opponents. (Unfortunately, our second division seemed to have missed the briefing on when to turn.)
This shot was reasonably early in the game. Eventually, I was able to cross the T (although it's really not a huge advantage to do so in these rules). Some of our ships were pounded but opposing fleet got hammered.
These rules are interesting but the gunnery seems pretty fiddly and the torpedo rules especially so. If I were to compare them (and I haven't played that much naval gaming), I'd say that the rules strongly resemble Avalon Hill's Bismark, especially the special damage chart.
I enjoy them but I think there's an over-emphasis on the number of guns. I'm not so sure that a ship with 4x3 guns should be more than twice as effective than one with 3x2 and it is in these rules. The advantage really comes into play at the longer ranges where there's a reward for having hit your opponent in the previous turn. The 12 tubes have a much greater chance of picking up that advantage and that's why the number of tubes rules.
Saturday, June 10, 2017
Trumpeter in May
When I arrived in Vancouver, one of the first things I did game-wise was to check out whether there was a convention. Well, yes there is and I had just missed it. But there's a club that runs the con and they meet the first weekend-ish of every month.
So come May, I went to check it out. There were some interesting games but there didn't seem to be much in the way of openings. I found a naval game going on in the corner and asked if I could join in. They were all very welcoming and I took over a couple of British battle cruisers.
The game was a Harry Turtledove-style alternative history with the British fleet fighting against the Americans in the early 20s. I got the Repulse and the Renown (I think).
On the first turn, the Renown took a hit that jammed her rudder to the left and it basically took her out of the fight. My die rolls were so hopeless that she didn't hit a thing until the last turn where the enemy was so close that she couldn't miss. Here you don't see her because she's off the bottom of the shot.

The Repulse, on the other hand, got off a lucky shot that temporarily knocked the stuffing out of the first American ship. I should have turned right early in the game but I went with the original plan of sailing hard and fast to the left.
Unfortunately, I didn't realize how slow the other ships on my side were. Plus they really weren't doing all that much damage. That left me with a bit of a dilemma so I decided to try to burst past the American fleet, lay smoke, and go for the convoy the Americans were protecting. My plan failed miserably as I became the centre of attention.
Cue the Ride of the Valkyries music...

So come May, I went to check it out. There were some interesting games but there didn't seem to be much in the way of openings. I found a naval game going on in the corner and asked if I could join in. They were all very welcoming and I took over a couple of British battle cruisers.
The game was a Harry Turtledove-style alternative history with the British fleet fighting against the Americans in the early 20s. I got the Repulse and the Renown (I think).
On the first turn, the Renown took a hit that jammed her rudder to the left and it basically took her out of the fight. My die rolls were so hopeless that she didn't hit a thing until the last turn where the enemy was so close that she couldn't miss. Here you don't see her because she's off the bottom of the shot.

The Repulse, on the other hand, got off a lucky shot that temporarily knocked the stuffing out of the first American ship. I should have turned right early in the game but I went with the original plan of sailing hard and fast to the left.
Unfortunately, I didn't realize how slow the other ships on my side were. Plus they really weren't doing all that much damage. That left me with a bit of a dilemma so I decided to try to burst past the American fleet, lay smoke, and go for the convoy the Americans were protecting. My plan failed miserably as I became the centre of attention.

Sunday, May 28, 2017
Hot Lead 2017
This is a rather late posting for something that happened in late March...
Hot Lead was a bit a strange event for me. I had been really busy the previous two weeks with job interviews all while hoping that to hear back from a company in the Vancouver area. They had pushed their decision back by a week so I didn't know what to make of that. So at the time, I had no idea what was in my future and it put a bit of a damper on purchases. But I had really come for the games. (As it turned out, I got an offer from the West coast company on the Monday so I'm really glad I went because it could be a while before I get to another Hot Lead con.)
Unfortunately, I didn't really take that many pictures. I played in three games but I am unable to recall the first one. Might have been the Italian wars. Maybe.
In the afternoon session, I played Guns of Gettysberg. Very nice rule set and it makes me very interested in picking up Pickett's Charge, by the same author. I had the lead brigade charged with gaining the hill so that the rest of the Union had room to deploy.
Unfortunately, the Confederates got to move first but I shot first. My first roll was a good one and it just completely unravelled the Rebs. By the time they had sorted themselves out, my cannons were pounding their left and my line and skirmish were taking their toll.

Having taken out the lead Rebel brigade, I was able to extend my left so that a fresh brigade could occupy the road on the left. The Union brigade arrived in the nick of time.

Meanwhile, on my right, a fresh Union brigade was starting to steamroll what was left of the Confederates.

In hindsight, this was going to be a tough scenario for the Confederates to win. It turns out that the hill was a trap. If I had gone first, I would have gone over the top of the hill and got blasted.

In the evening, I played in a game of Pikeman's Lament. It was very entertaining if a little lacking in period feel. I can see why the Rampant games are popular. They are fun. I had the left flank but the game was really 4 separate games in which we made no attempt to stay in turn with the other players.
My Scots Forlorn Hope were the real heroes. They dashed into the church on my right to prevent it being occupied for one turn. (I then realized that while it was helping Chris on my right, he really wasn't in any position to take over having had real problems failing his movement rolls. Rather than have them shot to pieces, I pulled them out on my next turn.) They then dashed to the other side to take out some musketeers. Having done that, they rampaged into the enemy pikemen and dispatched them. Finally, caught out in the open with dwindling numbers, they were finally gunned down by the last enemy unit.
I didn't take any pictures but fortunately, my fellow Scot Chris Robinson on my right did. You can see a couple of pictures of the affair in his blog: http://twothreesixmm.blogspot.ca/2017/03/hotlead-2017.html. Thanks to Mark for running the game. He had a very clever scenario and made for a fun event.
Sunday, May 7, 2017
Guardians
While I was in Vancouver, I happened to stumbled across these (almost literally, because I was head down trying not to get too wet):
A Ram II

And an M4 Sherman:

These two tanks stand guard beside the Beatty Street Drill Hall, which the home of the British Columbia Regiment.
The plaque says that this tank isn't actually the battalion commander's tank. I suspect that they bodged together two completely different tanks to create this display tank. The turret and port side came from a tank that was hit many times by an MG. Even though there's some hits on the front of the turret, there's none on the front hull. It is possible that the turret was turned to face the MG and that would account for the hits on its front but not on the front hull.
Here's the plaque. You can see some of the hits pretty clearly.
A Ram II

And an M4 Sherman:


These two tanks stand guard beside the Beatty Street Drill Hall, which the home of the British Columbia Regiment.
The plaque says that this tank isn't actually the battalion commander's tank. I suspect that they bodged together two completely different tanks to create this display tank. The turret and port side came from a tank that was hit many times by an MG. Even though there's some hits on the front of the turret, there's none on the front hull. It is possible that the turret was turned to face the MG and that would account for the hits on its front but not on the front hull.
Here's the plaque. You can see some of the hits pretty clearly.

Subscribe to:
Comments (Atom)