Sunday, November 30, 2014

Campaign for Big CoC

A couple of weeks ago, we kicked off a Chain of Command campaign using the Big rules for Chain of Command. It was Canadians vs the 12th SS in a slightly shorter -2 to 4 campaign ladder.

Game 1


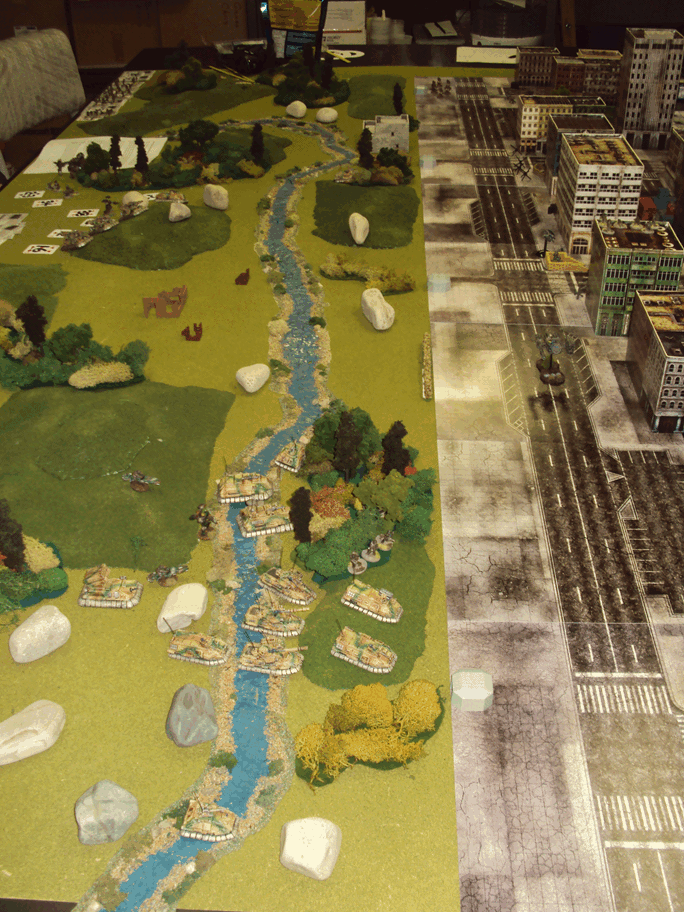
The first game was a shortish affair in which the Germans thoroughly out-scouted the Canadians. In this pic, the Germans started from the right.

While the Canadians tried to push hard on the flank, the Germans went straight up the middle and managed to get a jump off point close to the Canadian side and forcing the corresponding Canadian jump off points back to the table edge.


 The Canadians sent a section on the left flank and also sent a section against the German JOP in the center. A bold gambit to seize the JOP went badly as Richard rolled miserably for movement.


The Germans countered with an MMG. David didn't roll particularly well, so he added a squad (for 24 D6 of firepower).


After taking casualties in one section and accomplishing very little on the flank, the Canadians smartly withdrew.

Chalk one up to the campaign effect, in which the Canadian's chances of winning were small and the price would have been heavy regardless of outcome, so the effort was cancelled.


Game 2


With the campaign initiative, the Germans elected to strengthen their defenses. The initiative passed back to the Canadians. We rearranged the terrain a bit to reflect a slight change in the axis of the Canadian attack.

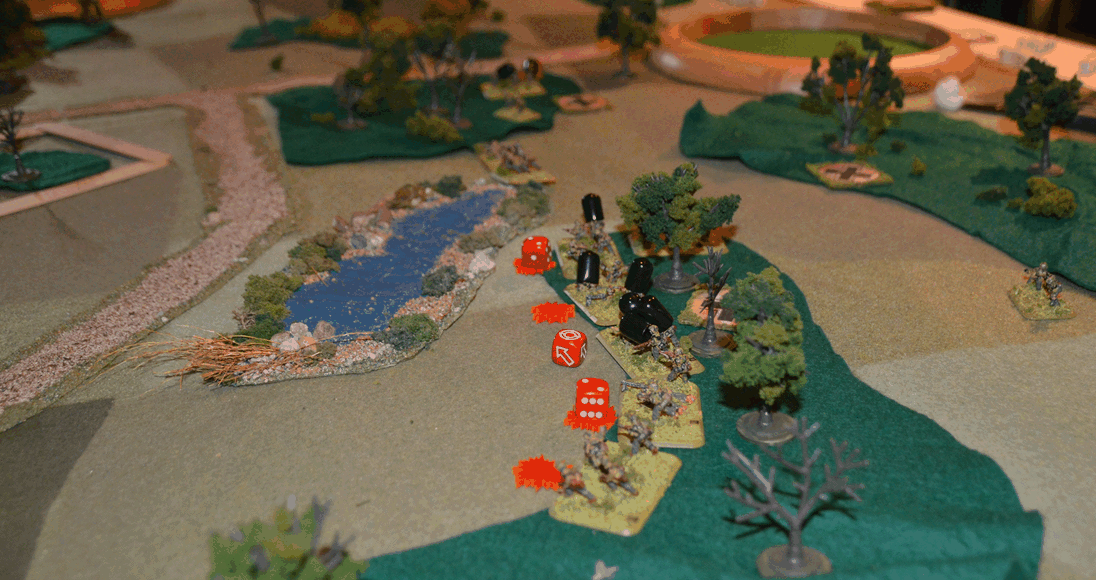
In this picture, the game is already several phases old. Ray deployed one section in the lighter green woods.


Stephen and David countered by deploying four sections against him. The weight of all that fire (half at close range) broke Rays section after a couple of phases. Ray deployed a second section that eventually suffered the same fate.


But the Germans had fallen into a trap. I was running the attached troops and I had selected a section and a FO. I deployed both of them and in a couple of phases had two German squads under a mortar barrage. The next phase, I moved it over 6" and added a third squad and one soldier from the fourth. The effect was devastating to the German squads as they all took some casualties.


Meanwhile, on the left, Richard had deployed a section, which prompted Stephen to deploy a squad in the center. I added a Sherman to turn the long range fight into a more equal affair. 


The Sherman's HE proved to be the difference maker so Stephen deployed a 'Shrek team. It's one shot immobilized the Sherman. It didn't get a second shot. The Sherman was immobilized in a good position where it could intervene in the center or on the right.

With the German center and right losing their firefight and still being a bit shaken with how devastating the mortar barrage had been on the left, the Germans elected to preserve their manpower and withdrew.

Game 3

The Canadians decided to advance on the main line of resistance. Having two sets of replacements available, the Canadians used one to top off their sections to bring them close to full strength. The Germans declined to use their one replacement draft. Once again, we rearranged the terrain a bit and added some hills and buildings.

I started off by deploying the tank and putting it on overwatch. Ray deployed a section on the right and started advancing through the woods. Richard deployed a section on the left, but due to poor scouting, he was once again forced to start from the edge. However, this wasn't as bad a disadvantage as previously because the German JOPs were a distance away and not in direct sight.

Stephen brought on the 'Shrek team again but this time they were far more successful. 9 hits out of 13 meant I didn't even need to make any defense rolls. Bye bye Sherman.

However on the right, Stephen deployed a German squad to stop the Canadian advance. Ray countered with a second section to make the dice thrown by both sides fairly even.


But the weight of numbers (and some better die rolling too) soon began to tell as the shock piled up on the ever shrinking German squad. Ray ordered up some close combat and that was the end of the German squad.

Meanwhile, on the left, David's Germans began a leisurely advance against Richard's Canadians hunkered down in the woods. Being in cover and tactical helped slow down the casualty rate and bringing on other units help whittle down the German attackers.


But there was an ominous clanking sound in the distance as a PzIV made its way onto the battlefield.

It was targeting Richard's Canadians when the tank commander got word to withdraw. Alarmed with Ray's progress towards the German JOP on their left, the Germans elected to fall back.


Sunday, October 26, 2014

Painting 2mm figures


Many people ask me how I paint something so small. Well, there's a few tricks but it's not quite as hard to do as you would think. The other key thing is to paint the figures much brighter than you would larger figures so that they stand out better.

Materials 

  • Plasticard (styrene) or some other mounting material such as MDF or chipboard.
  • Black primer (a matte primer is best but a satin finish is fine. I use cheap rattle can stuff).
  • 1 small paint brush with a really good tip. 
  • 1 small paint brush that no longer has a good tip for drybrushing. 
  • 2 really good lamps so that you can see what you are doing without shadows.
  • Paints (model and craft). 
  • Flock or other ground cover material.
  • Steady hands or a good desk to lean on. 

Recipe

  1. Mount the figures on some plasticard (styrene).
  2. Start by spraying the miniatures with the black primer. This provides a good background and seal for your painting.
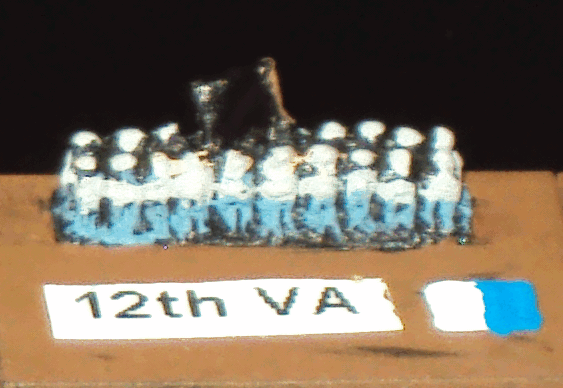
  3. Paint the plasticard brown with some craft brown paint. I use craft paint for this because it is cheap. I use the model paints for the rest because they contain a lot more pigment and have better coverage. On my plasicard, I've added a name and a colour code to indicate which brigade and division it belongs to.
  4. Using the tatty brush, dry brush the legs. If you don't know what dry brushing is, it's where you dip the brush in the paint and then wipe off most of the paint on a paper towel before you paint the figure. You don't have to be all that neat here. The only real key is to have the paint hit the legs and leave the non-leg area black.

  5. Using the tatty brush if it's not too tatty or the fine brush, paint the torso of the figures.

  6. Using the fine brush, paint the guns held by the figures. If the torso is a darkish colour, choose a lighter brown for contrast. If the torso is a lighter colour, go darker. This step is where you need more finesse and fine motor skills. I find I can get about 4 guns done per dip when the paint is fresh on the palette and less as the paint gets thicker. You'll need to clean off your brush between dips and get rid of moisture. The key is to paint thick and don't let the paint flow off the guns and onto the uniforms.
  7. I like to add hands to the guns to provide that pop of detail but it's really only worthwhile if the gun colour is on the darker side. Choose a bright and light flesh colour. I use the fine brush or sometimes I'll use planter's wire. Just dip a small dot where each hand would be. If you have too big a dot, go back with the brown colour and paint the dot smaller.
  8. Paint the face on the front and top of the heads. Not too much precision here as long as you don't get the flesh colour on the uniforms or down between the figures.
  9. Paint the top and backs of the heads with the hat colour.
  10. Paint the flag. I had to paint the flag white first because my red and blue paints are a little light in the pigment department, and on black, they go too dark. The white makes the other colours pop. I painted the red triangles first to leave the white cross. Then, counter-intuitively, I painted the blue as dots. I put enough dots that they sort of blend together with some white showing through to represent the white stars on the flag.
The whole key is to leave the impression that it's precisely painted. It really doesn't have to be. A pop of flesh colour in the general location of the face is good enough. Similarly, a couple of tiny bits of white will represent a bunch of stars on a flag. The suggestion is enough. People's minds will fill in the details for you. Here is the final result after painting the base green and flocking it:

Remember, these guys are half the size of a grain of rice. They don't need much detail to look good.

Tuesday, October 21, 2014

Gruntz from a while back

More than a while back, we had a gaming session at Stephen's place. He set up a game of Gruntz. I was on the Kraavak (whatever the spelling is) defending a recently taken over city from the humans.
I was given the task of defending the left flank. Basically, the bottom of the picture to just beyond the tall red building. I put my two infantry squads in the lower buildings along with an APC to carry them if the humans attacked the right and I needed to get them over to the other side. A plasma cannon and crew manned the checkpoint. A heavy skimmer was parked between the red building and the lower building while my heavy tank was parked in the entrance to a underground car park on the other side of the red building. My commander was in the top floor of the red building but he had a zip line to his mech ready to go so that there was no waiting for the elevator or running down the stairs.
Here come the humans. Apparently, our patrols weren't very good. However, the humans were cautious so we were given time to man our vehicles.


After an initial slow start, the humans (Justin specifically) got brave and charged forward. My lurking heavy skimmer got off two long range (and somewhat lucky) shots at a human APC. Poof. Along with the squad it was carrying.
Two human tanks zipped between the buildings to deal with my lurking APC. However, it was tipped off to the impending danger by my infantry and was ready. Two lucky shots from overwatch fire dealt with the first one. I made sure my APC got an early activation to damage the other tank and my second heavy skimmer finished it off.

Meanwhile, another human APC dropped off a squad to enter a building. My waiting squad poured into them and almost wiped them out. My first heavy skimmer put a beating on the APC.

My other squad dealt with the "medic" so that there were no resurrections happening.
The two infantry squads then combined to take out the hurt APC. The remaining APC ran for the hills while picking up the surviving infantry.

In this image, you can see the my heavy skimmers, which were untouched. My commander, though, had recklessly ventured into the open to support the infantry and was in turn heavily damaged. Had we gone another turn, I would have had him run for cover. My heavy tank had to content himself with an AA role and helped down a heavy VTOL carrier.


Friday, October 3, 2014

Progress on my 2mm ACW troops

Now that I've completed all of my 28mm Russians, I've returned to my 2mm Americans. When I last left off, I have based and painted all of the ones I had. What I hadn't got to was labeling them and flocking the bases.

I've done that now. I have completed the entire 2nd Corps of the Union army at Antietam, the Cavalry Corps, and started on the 1st Corps. Here's a shot of the 2nd Division of the 2nd Corps:

I used the trefoil symbol that the 2nd Corps used and also the colour system they used within the corps to denote the division. Red for the first division, white for the  second division, and blue for the third division. I expanded on that to surround the trefoil with a colour for the brigade.

Here I have a picture so that you can see sort of what this looks like from the front. I'm rather pleased with the result.

Monday, September 1, 2014

6mm Americans from Adler

I've had these little guys painted for a while now and they were documented in a previous and now defunct blog. But since I have this blog and I have some pictures of them, I might as well have a post about them here.

These are wonderful scupts. There's a lot of animation and detail in them as you can see in the following pictures. This is the same stand showing the front and back.


The webbing isn't painted on. That's detail that's on the miniature. All I did was highlight it with a bit of colour and use a black wash.

Here's what I mean about the character. Can't you just feel the determination oozing from the
tommy gunner?

Leon at Adler does a nice job of packaging his miniatures into useful groups. I ordered his engineers and they came with some flamethrower crews:


I've based all of these guys for BKC, so I've done some command stands for the CO and HQs. Here's one that features a GHQ Dodge command car as well as three Adler figures. The two on the left are yelling orders over the radio.

 Finally, here's just under half of my Americans.

Wednesday, August 27, 2014

Beer Interlude: Mons Abbey Dubbel by Belgh Brasse

7/10
This Quebec brewery out of Amos, Quebec (if you are looking on a map for it, find Ottawa and keep going north. No, further north. Keep going. Almost there. Yes, way the hell up there.) specializes in brewing Belgian style beers. Every time I'm up there, I try to pick up a bottle or 5 of their beer.

This one opens with a powerful whiff of bottle-conditioned goodness. It gets an instant head and you have to be ready to pour it immediately. To the eye, it's very dark but if you hold it up to the light, you can see ruby red tones.

It doesn't have an overly strong bouquet. There's a hint of chocolate and coffee. When you taste it, the chocolate comes on strong and the coffee fades away. Other notes replace the coffee. I'm reminded of strawberries and raspberries so this is a good thing. The flavour lingers and the slight coffee returns. Going down, this is a velvety smooth brew.

But it's velvet hammer. It's 8% alcohol and I have an entire bottle to myself that I will enjoy. I shall probably be to blotto to post responsibly but I don't care.

Salut!

Friday, August 22, 2014

Beer Interlude: Road Trip!

Last weekend, my lovely wife fulfilled a Christmas promise and booked a brewery tour for the Niagara area (actually, the breweries were all in the Niagara on the Lake area instead). Now Niagara on the Lake is particularly noted for being wine country but it turns out that there are a few craft breweries making their presence known. We were accompanied by our good friends Catherine and David. Our driver for the tour was Jim and he made all of the arrangements.

The first stop was as at Oast House (http://oasthousebrewers.ca/). An oast building was originally used to dry hops in England. I've actually had the brewery's Biere de Garde before when I was having a dinner at the Weinkeller (an excellent restaurant in Niagara that I highly recommend). I enjoyed the Biere de Garde but found it a little too hoppy at the end for me to love it completely. We did a tour of the back area to see the kettles, vats, and whatnot. I also learned that hops added at the start of fermenting bring taste to the mix and hops added at the end bring bitterness.

I hadn't really realized what a hop plant looks like. Now I know. It's basically a vine that grows from basically nothing to 30 feet every summer and puts out what looks like small sort-of pine cones. Oast House has a small circle of them growing and they have an number of farmers growing hops for them as well so they should be able to use their own hops starting next year.

We sampled their Saison and their Barn Raiser. Both are bitter in the finish. The Saison, which I enjoyed the most, starts off with a nice lemon taste before the hops take over. I have two bottles which I'm going to let sit around at room temperature for a while to mellow them out a bit. The Barn Raiser was a brown ale that was OK but really too much bitterness for me to fully enjoy.

Next was lunch at the Old Winery restaurant (http://www.theoldwineryrestaurant.com/). Very nice place but a bit off-theme for a brewery tour. It's Italian in theme and I had the wood oven veggie pizza. I accompanied it with a Leffe Brown Ale to bring a bit of balance to the bitterness I had encountered earlier.

Off to Silversmith (http://www.silversmithbrewing.com/). The restaurant part of this brewpub is in a former church. It looks fantastic on the outside and on the inside. Unlike many Canadian bars and pubs, there's no TVs and the background music is barely there. They use chalk to write down what they are serving. Fantastic! We got our reserved seats and awaited our flight of samples. I was so looking forward to them, especially the Damn Buster English ale.

And I was so disappointed. I started with their wheat beer, figuring to start with the lightest in colour and taste. It wasn't overly flavourful but it was overly hopped. I was surprised at how bitter it was. And the samples just kept getting more and more bitter the darker they were. The Damn Buster was basically undrinkable. David said that was like drinking medicine and I have to agree. Silversmith, there's no award for making the bitterest beer! If there is, there shouldn't be!

Off to school next. Niagara College has a culinary department that includes brewing courses. Of course they have samples! I tried their Butler's Rangers brew, which was bitter but drinkable and their First Draft ale, which was lighter in colour and taste but still on the bitter side. I know that David tried a couple. He handed me a glass of Red Eye Sour. Now I've had the Rodenbach Sour and it might be the best beer I've ever had (if it isn't, it's right up there). Red Eye Sour is the polar opposite. It might be the worst I've ever tasted. It basically has the same taste as the ultra-hot sauces usually have but without the heat. Absolutely nasty. I'm hoping the teacher gave whoever "brewed" that stuff an F. Just because you can dump a gallon of cheap and nasty hot sauce in beer doesn't mean that you should.

(As a side note: what's up with all this bitter beer in the Niagara region. A year or so ago, my wife and I went to the Syndicate brewpub in Niagara Falls and I really didn't like their beer all that much because of the lingering bitterness. Maybe Niagara folk are made of sterner stuff than me?)

Our final stop was the Olde Angel Inn in Niagara on the Lake (http://www.angel-inn.com/home.php). This was the perfect place to end the tour. The pub part is very much English in style so I thought I would order a pint of Angel English ale. I'm glad I did. It took half a pint to cleanse my palette from all of the accumulated bitterness. The remaining half went down slowly and smoothly. The perfect pint to end the day.

Wednesday, August 13, 2014

Soviet Platoon for Chain of Command

At Hot Lead, I purchased a box of 28mm Soviet WW2 troops from Warlord along with a MMG and a mortar (technically an 81mm but it will serve as a proxy for a platoon mortar). I finally completed them last weekend.

Here are the troops ready to kill the fascists.

These figures paint up nicely. Here is a section:


To give you an idea of how nicely they are sculpted, here's a close up:


Most of the paint is Vallejo. I used Russian Green for the helmet, Reaper tanned skin, Russian Uniform Green, Leather Brown for the belt and cartridge cases, Violet Green (?) for the blanket, and I think Khaki for the straps and puttees. I then gave them a coating of my depleting Devlan Mud was. I then went back and hit the high areas with the original colour to counteract the darkening and colour change done by the wash. I finished them off with a couple of sprays of Dullcote. I've never used it before and it's a little shinier than I thought it would be.

Just in case my troops do not show sufficient bravery and self sacrifice, I've done a Commissar. Unfortunately, the picture does not show the nice blue he has on his cap. Trust me, it's there and nicely painted too.


I have some anti-tank troops as well. Here are the tank hunters. I can have them throw an anti-tank grenade or a molotov cocktail. I've updated the flame in the cocktail after this photo so that it is a bit brighter than what is shown here:


Here is the longer ranged solution:


Here are the metal figures I bought. I prefer the plastics to the more cartoonish metals. Judge for yourself. Here's the mortar team:


And here is the MMG team (at least the ones that came in the blister pack. Obviously, I'll add a couple of rifle men in the game to bring the team up to full strength):


Finally, a sniper team. This is my favourite photo because it captures the animation and detail in these figures best.


I do have a few questions though. I want to get another platoon. I could go for another box of Warlord but I'm wondering about the Wargame Factory Russians. Are the comparable in size and bulk? Would they mix and match well? Do they have a nice mix of weapons and poses? Do they have options that are not available in the Warlord box?