 |
As a puppy maybe 3 months old. |
 |
Surie at 6 months with her half-sister Milou. |
 |
Surie was a child-certified St Johns Ambulance therapy dog for 9 years. Here she is taking a well deserved rest after meeting so many teenagers at a technology camp. Most therapy dog sessions are under an hour in length. Meeting people is very draining and one of our duties as a handler is recognizing when our dogs have had enough. |
 |
Surie would visit regularly visit residents at a nursing home and special needs students at a high school. She would also attend fund raising events and other special events. |
 |
We attended a number of Remembrance Day parades. Surie hated the cold so these weren't her favourite events. But she enjoyed the afterparty in the Legion Hall. |
 |
Surie's favourite game was Fetch. Or rather putting the toy down, waiting for me to reach down for it, and then snatching it away. After some wrestling time, she would let go so that I could throw it again. |
 |
Surie was an amazing traveller. She had her own booster chair so that she could look out, but most of the time, she just slept. Here we are on our drive from Ontario to BC, stopping in Winnipeg for this picture. |
 |
When we picked up Surie as a puppy, she was accompanied by a plush pink rabbit. This was her constant companion and she used it as pacifier/comforter every day of her life. As a puppy, she quickly shredded the tennis ball body that bunny had, but otherwise left Baby intact. One squeaker in a leg was still working to the end. |
 |
Me carrying Surie carrying Baby. |
 |
One of our last pictures of Surie. She couldn't see me but she knew I was there. |
Tuesday, October 4, 2022
Memorium
A little while back, our little fur baby crossed over the Rainbow Bridge. I miss Surie and I wanted to post a tribute to her.
Friday, September 30, 2022
KEGSCon 2022
Wow, it's been a long time since I posted.
In terms of gaming, it has been pretty quiet. I went to Hot Lead. I started to create a post for it but never got around to finishing it. I unpacked a couple more gaming boxes into my hobby area but that is far as I got.
But I did go to KEGSCon last weekend in Chatham. I ran a game of Chain of Command, which went fairly well. I find that most CoC gamers in conventions tend to be cautious, and this game was no exception. While the Russians were getting pretty shot up, since we were playing the Probe scenario, they did have a chance for a win if they got some good movement rolls and resolutely pushed on.
 |
| After the initial deployments, with Russians on the right and Germans on the left. |
 |
| The Russians at the top have been massacred to ineffectiveness while the Russian pressure at the bottom is taking effect |
 |
| Near the end of the game, the Germans advanced at the bottom as did the Russians at the top. |
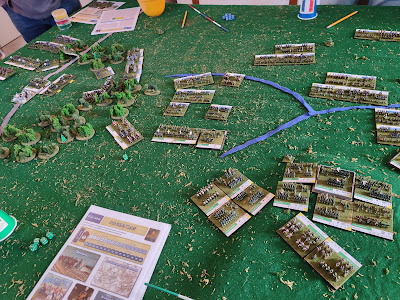
In the afternoon, I played in a game of late medieval Swiss against Burgundians. The Swiss really need to close quickly and get stuck in, but were doomed by poor morale rolls at inopportune times.
 |
| Swiss advancing against the steady Burgundians and then failing morale rolls. Only half the Swiss units are still on the board |
Other games included an IABSM featuring a British assault on a German fortified hill late D-Day.

A Charlie Company game with the Viet Cong assaulting a US position.

Finally, a Mexican Revolution game (using Sharp Practice 2 rules)

Wednesday, February 23, 2022
Borodino: Practice for Hot Lead
 |
| Right flank French are repulsed from the redoubt and capturing Borodino on the other side of the river. |
The game is intended for 6 players at Hot Lead but we had to make do with two players a side. The set up had the Russians defending with scattered bits of corps, which were generally smaller in size to the French corps.
(Unfortunately, we forgot to take pictures until half way through)
 |
| Russian left where things were going well,until they weren't. French corps in middle being worn down |
The arrival of the French reserves made a huge difference on the far left, where the combined impact of French infantry, artillery, and cavalry began pounding the Russian forces. It was looking decidedly grim for the Russians by the time I left to return home. In the center-left, the Russians were doing well and were more than holding their own. The only real concern was the emergence of French cavalry from the woods and onto the left flank. I think the Russians could hold out with the arrival of a fresh division of cavalry and Russian guard.
 |
| Just before the Grand Battery wipes out the French garrison in Borodino and the Russian cavalry charged |
On the far right, the French managed to take Borodino, but suffered the loss of their artillery to marauding cossacks. The division that took Borodino was then wiped out by a couple of massive bombardments from a massed grand battery. The grand battery also hammered at the French hordes that were flanking the redoubt. A cavaly charge vapourized one French division and caused some of the horde to beat a hasty retreat.
When I left, the Russian left was in real trouble, the centre-left was holding out but there was cause for concern. In the centre-right, the Russians were being thinned down but still holding out. The real question was whether Kutusov's fresh infantry and the grand battery could deliver the hammer blow before the Russians gave out in the centre and far left. I'm not sure they could because there were still a lot of French troops there.
I had a lot of fun with this and we learned a few things about how to run the scenario in Hot Lead, so that is a bonus.
Monday, November 29, 2021
O Group Test Drive II
 |
| Midway through, the Germans below have already lost a platoon. Top, the German advance begins. |
 |
| German attack succumbs to mortars, fire from the upper village and tanks on the road, |
The German attack came unstuck pretty quickly due to a hesitant company, a couple of timely and effective ambushes, and some horrendous die rolls at the worst moments.
We made a number of mistakes that I know of:
- I should have rolled for the effects of mortaring on my HQ and a combat patrol when the Germans mortared the town a couple of times. In my defense, they did specify that the MMG was the target so I didn't think about area of effect. This would have meant that the Canadians would probably have had to spend a couple more orders to rally off shock or replace combat patrols.
- The AT gun in the town should not have gotten the defensive bonus for being in a town. This was something that the rules author cleared up in the Lardies forum.
I know that there's a bunch of other rules that we missed or forgot. I'll have to make a post summarizing them to help me remember them.
Tuesday, November 16, 2021
O Group Test Drive
 |
| Starting positions with the British attacking from the left and the Germans defending the wood line |
 |
| In the foreground and background the Brits advancing to the woods where Germans await |
 |
| Post ambush with a Brit platoon down to one section. Background shows Brits reeling from artillery |
The scenario is tough for the British to win. Their only chance is to move quickly and scout aggressively. It would have been nice if the scenario had pointed this out to help the British. I would like to try it out playing the British next time to see how being quick and aggressive would work out.
As far as the rules go, they seem very interesting. They could be better organized and the missing page numbers are a major pain (one that I will fix by writing them in myself). But the system itself seems to make sense and work out well.
Tuesday, November 9, 2021
The Guns of Cape Spear

It also has two gun emplacements. They were built in 1941 to protect the approach to St John's harbour.

Each emplacement consisted of a single gun with hide-away carriage that would drop the gun down behind concrete and earth embankments while it was being loaded.

The emplacement had a ready room where the on-duty crew could relax and a small magazine to hold the ready shells and powder. I'm not sure where the main magazine was.

Sunday, October 31, 2021
KEGSCON 2021 (Better Late Than Never Review)
This quite a bit later than I had planned, but I've had a busy October.
So it's been a very long time since I went to a gaming event. The last one was the Trumpeter event in March or April of 2020. (Trumpeter has resumed as of this October but I'm no longer in BC.)
I knew that KEGS is in my area, and I've even gamed with some of its members in various Hot Lead conventions. But I learned that they planned to hold a one-day event at the end of September and I was all for it.

The scenario was two mirror image forces were to loot a village for rice and livestock. My good friend Stephen took the two groups of Red Ashigaru and I took the Red Samurai and archers. Stephen took his forces to the right to enter the village from the back gate. I took my forces to the left to cover the front gate.

Opportunity came in the form of a nice hand and my Red Samurai charged the Blue Ashigaru, who were not in shield wall (or the Japanese rules equivalent). Quality told and eventually the Ashigaru routed for the cost of only 2 Red figures.
I then tried to pursue the Blue Samurai, who had looted the livestock. I could not get the chips to come out in a favourable way, so the Blue Samurai got away.
My second game was a Franco-Prussian battle using Bloody Big Battles. The French objective was to capture three villages, spread across the battlefield. |
| Turn 1 with green French on the far left. Prussians are capturing the middle village in the upper right. |
The Prussians had a small force defending a hill on the close left edge. The French came on from that corner and later arrivals would echelon a cross the battle field. The Prussian later arrivals would similarly echelon across their edge.
 |
| Rolling up the Prussians on the left with French reinforcements arriving on the right |
While my troops had better long range weapons, they were inferior in quality and lacked skirmishing. The Prussian artillery was also much better, so I figured that duking it out in a shooting match was not going to work out. I barreled forward and, to my surprise, was able to push the Prussians out of their defensive lines with relatively few casualties. It seemed that the greener my troops were on that flank, the better they did, with them eventually rolling up the entire Prussian flank and capturing the furthest village, for the cost of a brigade of cavalry and a couple of stands of the better troops.
The Prussians got to the central village first, but I managed to turn it into a reverse Verdun. I put two full brigades and their artillery against a weakened brigade defending it. Numbers eventually told as I first removed the supporting units before routing the defenders.
 |
| Rolling on the left, massing to attack the centre village, and reinforcements arriving on the right |
On the right, I had basically conceded the right-most village to the Prussians, who had detached a regiment from the central brigade. My plan was to overwhelm the Prussians with my reinforcements. But the Prussians hesitated, so I occupied it instead. I instead concentrated on making enough room so that I could deploy all of my troops against the oncoming main Prussian force. The Prussians made an attempt to capture the village but they didn't sufficient numbers at the point of attack and got overwhelmed. At this point, the French controlled all three objectives and the Prussian left and centre were almost non-existent, so we called the game with a decisive French victory.
 |
| Capturing the left village, wearing down the Prussians in the middle, and defeating them on the right. |
The French certainly benefitted from luck at two key moments: the mad rush against the Prussians on the first turn, especially by the green troops. I had expected them to hammered while I attacked with my better troops, so I was essentially using them as distractive cannon fodder. But they lived a charmed life throughout the game and bulldozed whatever unit happened to be in front of them. The second key moment of luck was the hesitation before the village. It meant that I didn't have to expend time and units taking the village and I could instead set about attacking the other Prussians.
 |
| Final position with the French in control of all 3 villages |
My thanks to both Mitch and Brian for putting the games on. It was so nice to go to a con and play games in person.
Subscribe to:
Comments (Atom)